Organization Manager Starter Guide
👋🏽 Welcome to 11Sight!
Comprehensive manager guide with everything you need to know to get started.
Total Reading Time: 9 minutes
Total Setup Time: 30 minutes
Tip: When you see “navigate”, you can click on the links to go to that specific page.
What are e-lines?
Reading Time: 30 seconds
e-lines are URLs that can be used to start a video call from any online channel.
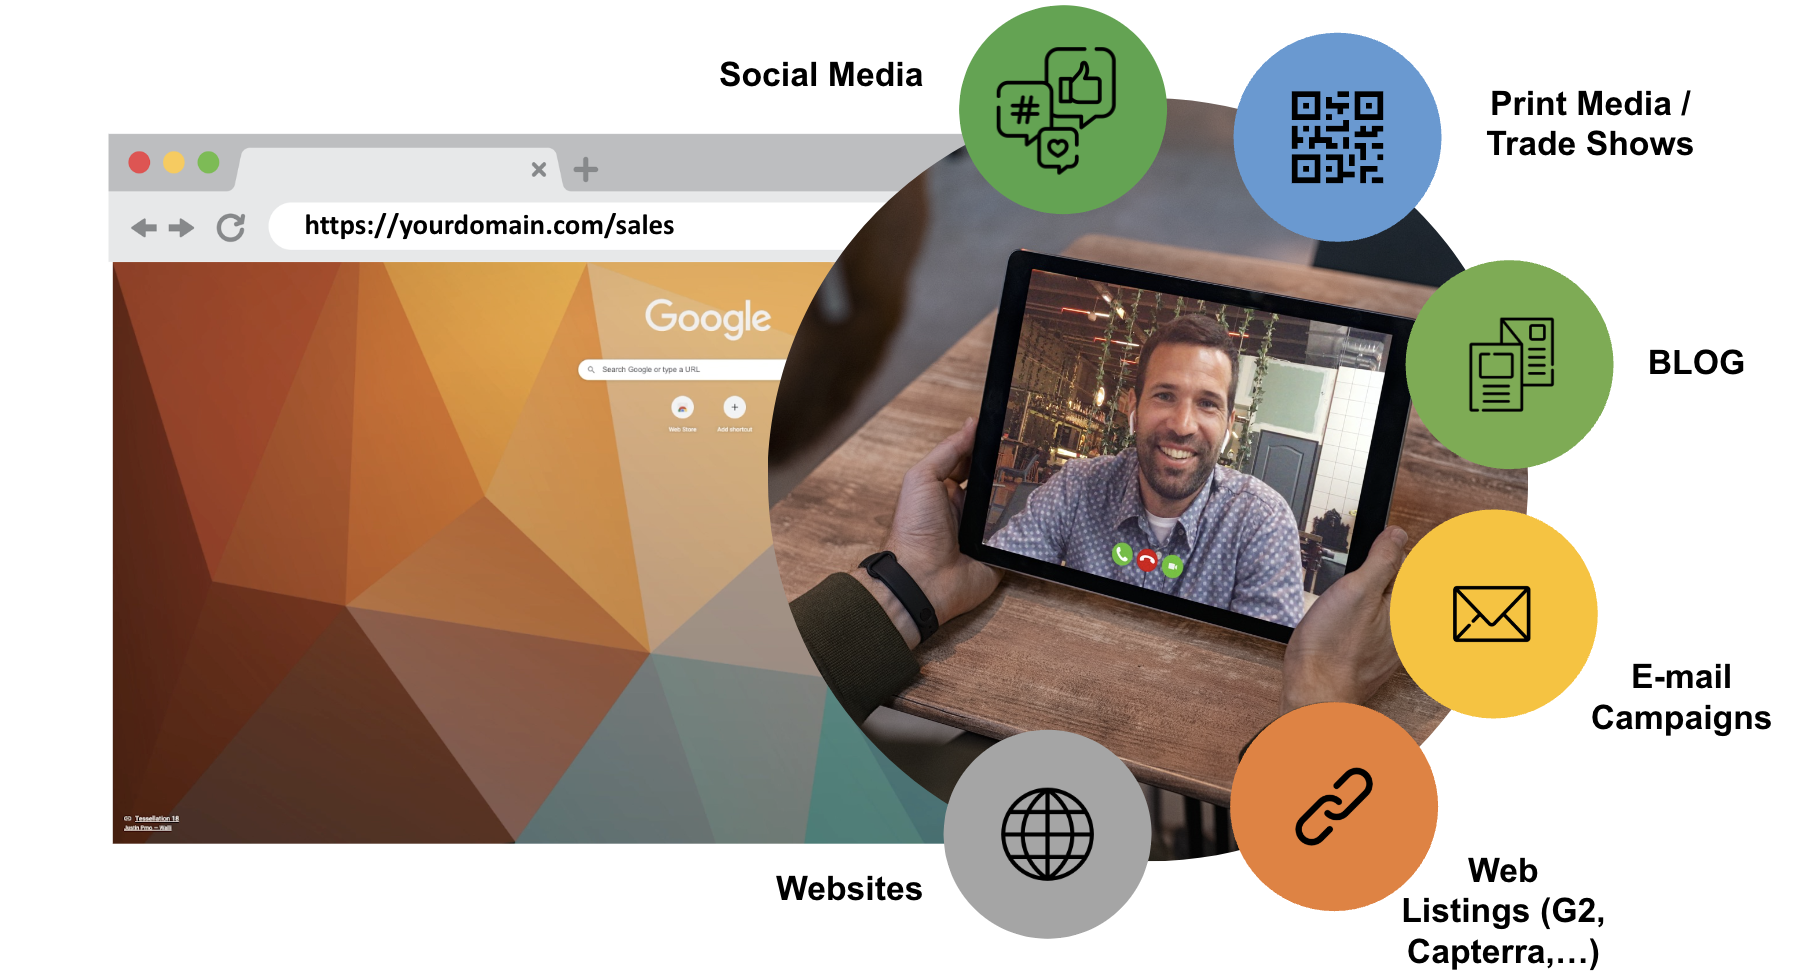
This is how it looks like for your customers:
Types of e-lines
There are 2 types of e-lines:
User lines - calls the owner of the e-line directly

Team lines - rings multiple team members at the same time

All e-lines can be escalated to another user or team, in case you are not available or can’t answer the call.
Receiving and Answering Calls
Read this section to answer: “How do I login?” and “How do I answer calls?”
Reading time: 1 minute
Setup Time: 1 minute
Logging in to your account
When your organization manager creates an account for you, you will receive an email with your login credentials. You can login to your account here.
If you’re having trouble logging in you can reset your password or contact support.
Answering a call
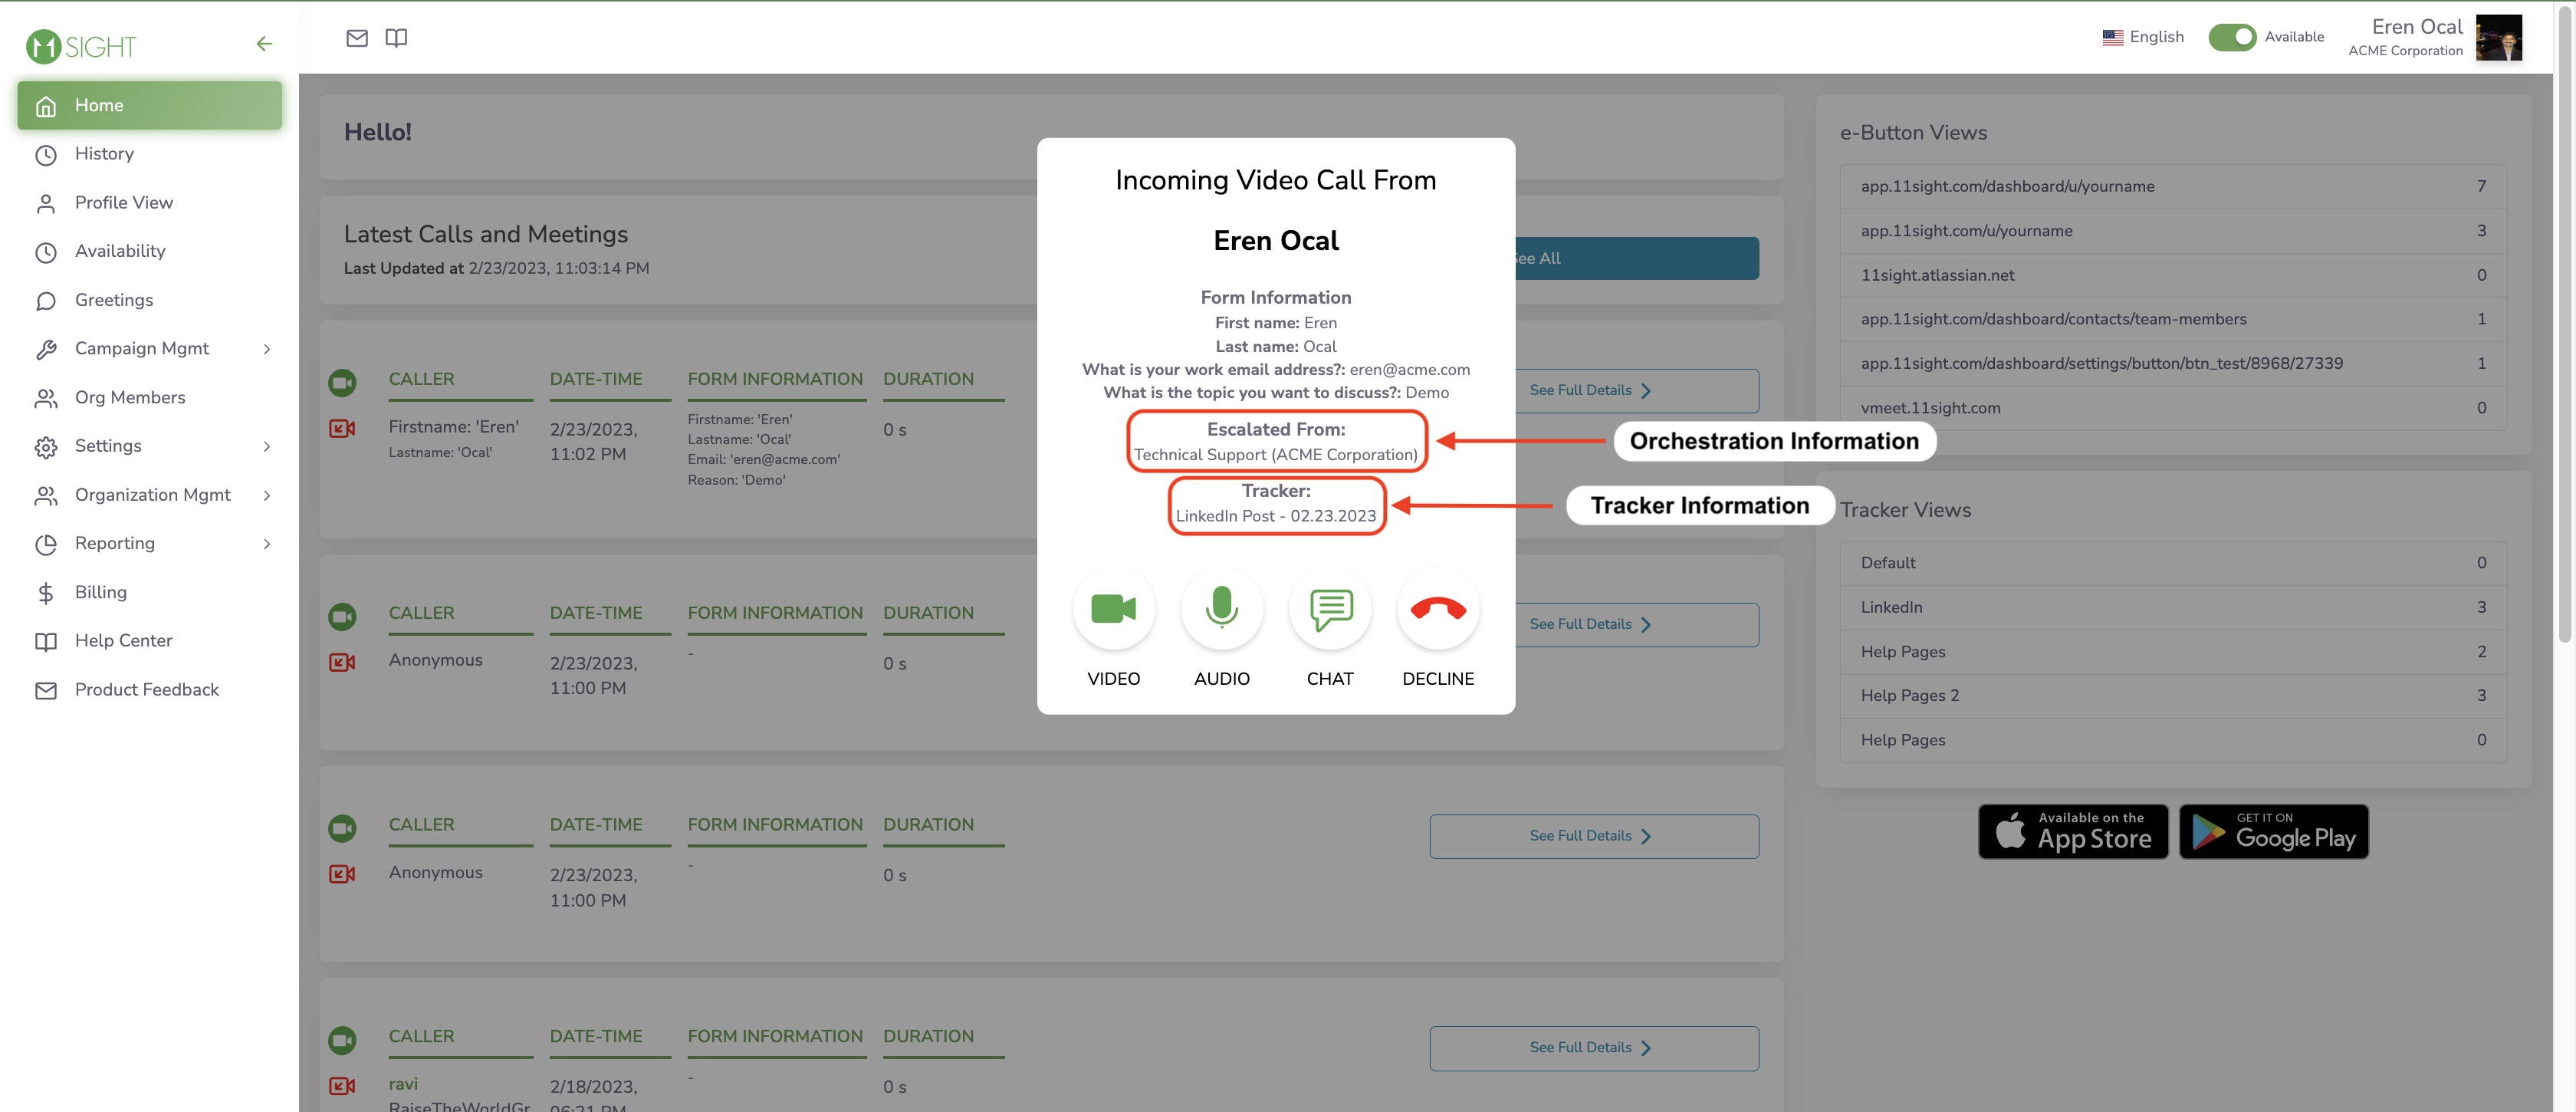
When you receive a call you will see a ringer pop up like the one below:
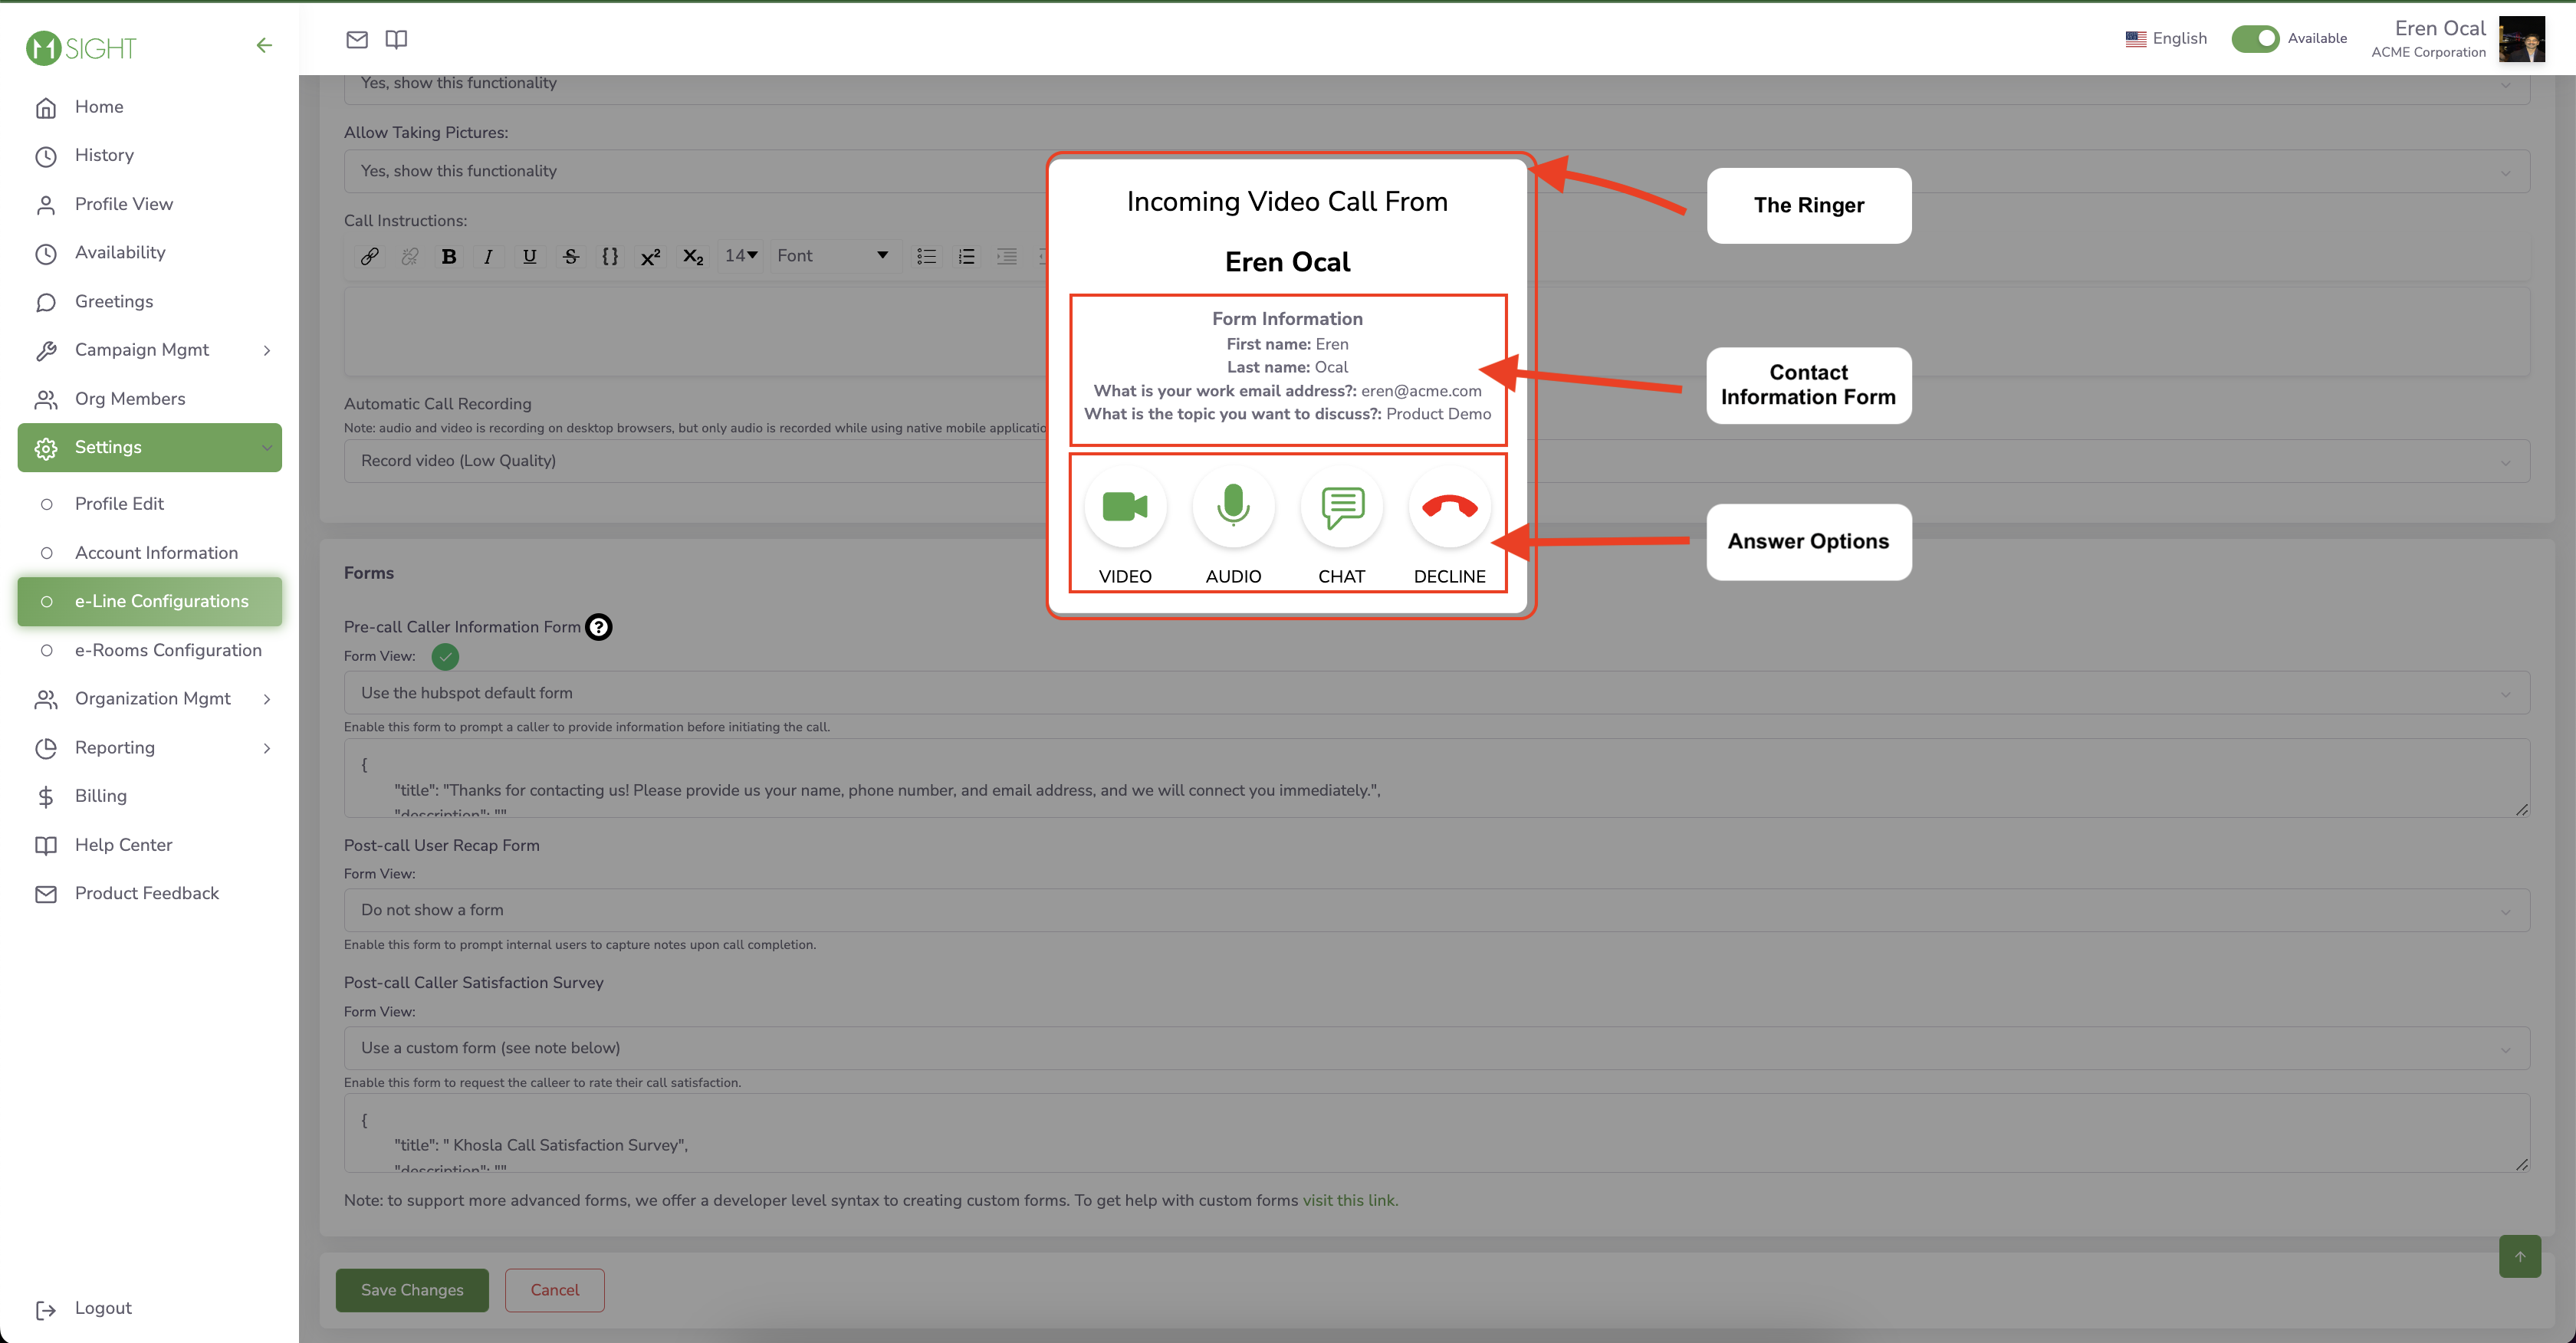
If your organization has contact information forms enabled, you will see the contact details your caller has input. Click on an answer option to answer the call.
In order to receive calls, you need to be logged in on either:
11Sight’s browser application and have it open in a tab, or
Helpful Tools for Answering Calls
Read this section to answer: “What are some tools I can use to help my team answer calls?”
Reading time: 45 seconds
Setup Time: 2 minutes
Having trouble finding which tab the call is coming from?
Download the Chrome extension! This extension will pull the tab with 11Sight to the front when you receive a call so you don’t have to search for it.
You don’t need to configure anything, just download the extension and it’s ready to go.
The extension won’t work if the 11Sight tab is minimized.
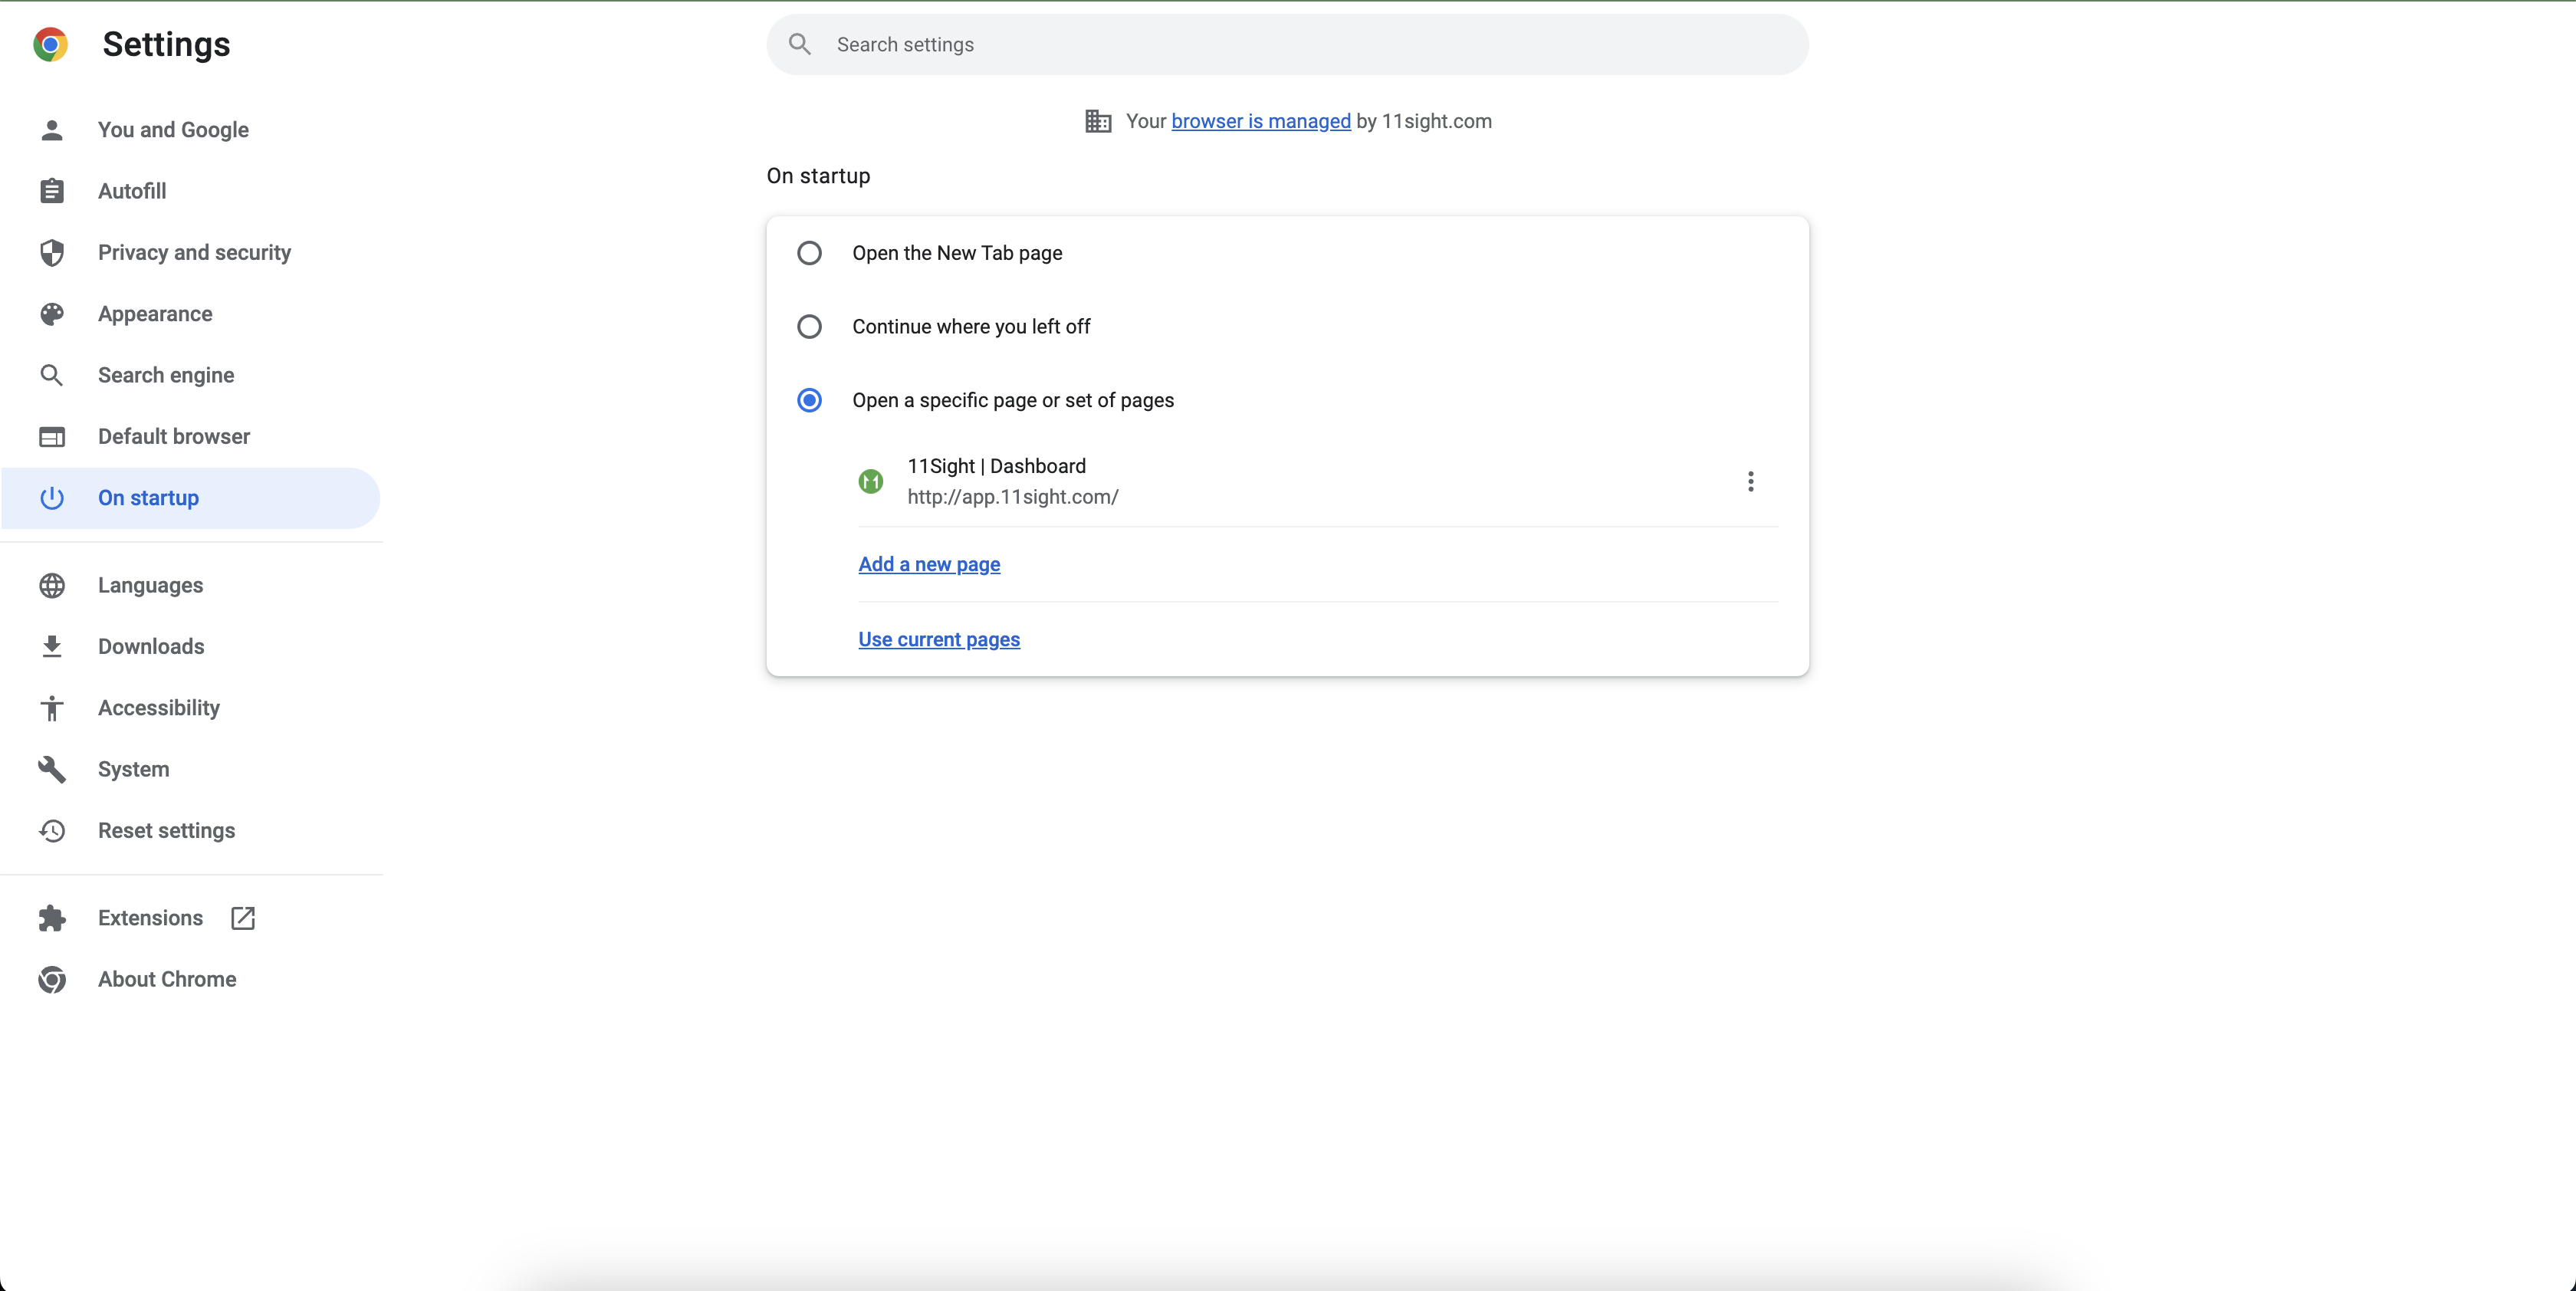
Do you forget to keep a tab open with 11Sight?
You can configure 11Sight to open up when you open Chrome. Navigate to Chrome settings > On startup and add app.11sight.com under Open a specific page.
Doing a Test Call
Read this section to answer: “How can I make a test call?” and “What can I do in the call?”
Reading time: 1 minute
Setup Time: 5 minutes
It is important to test that your system and devices are set up correctly, so you don’t run into issues when you start answering calls from prospects and customers.
Finding Your Call Link
There are several ways to call yourself, but for this test we will be using Short URLs.
First navigate to Campaign Management > Short URLs from the side menu.
Next click on the icon you see here to start the call in a new tab:

Once you start the call, your devices will start ringing. If you’ve downloaded the Chrome extension, the browser will automatically switch to the tab the call is coming from.
After the Call Connects
After the call connects you will see several options in the left-hand menu.
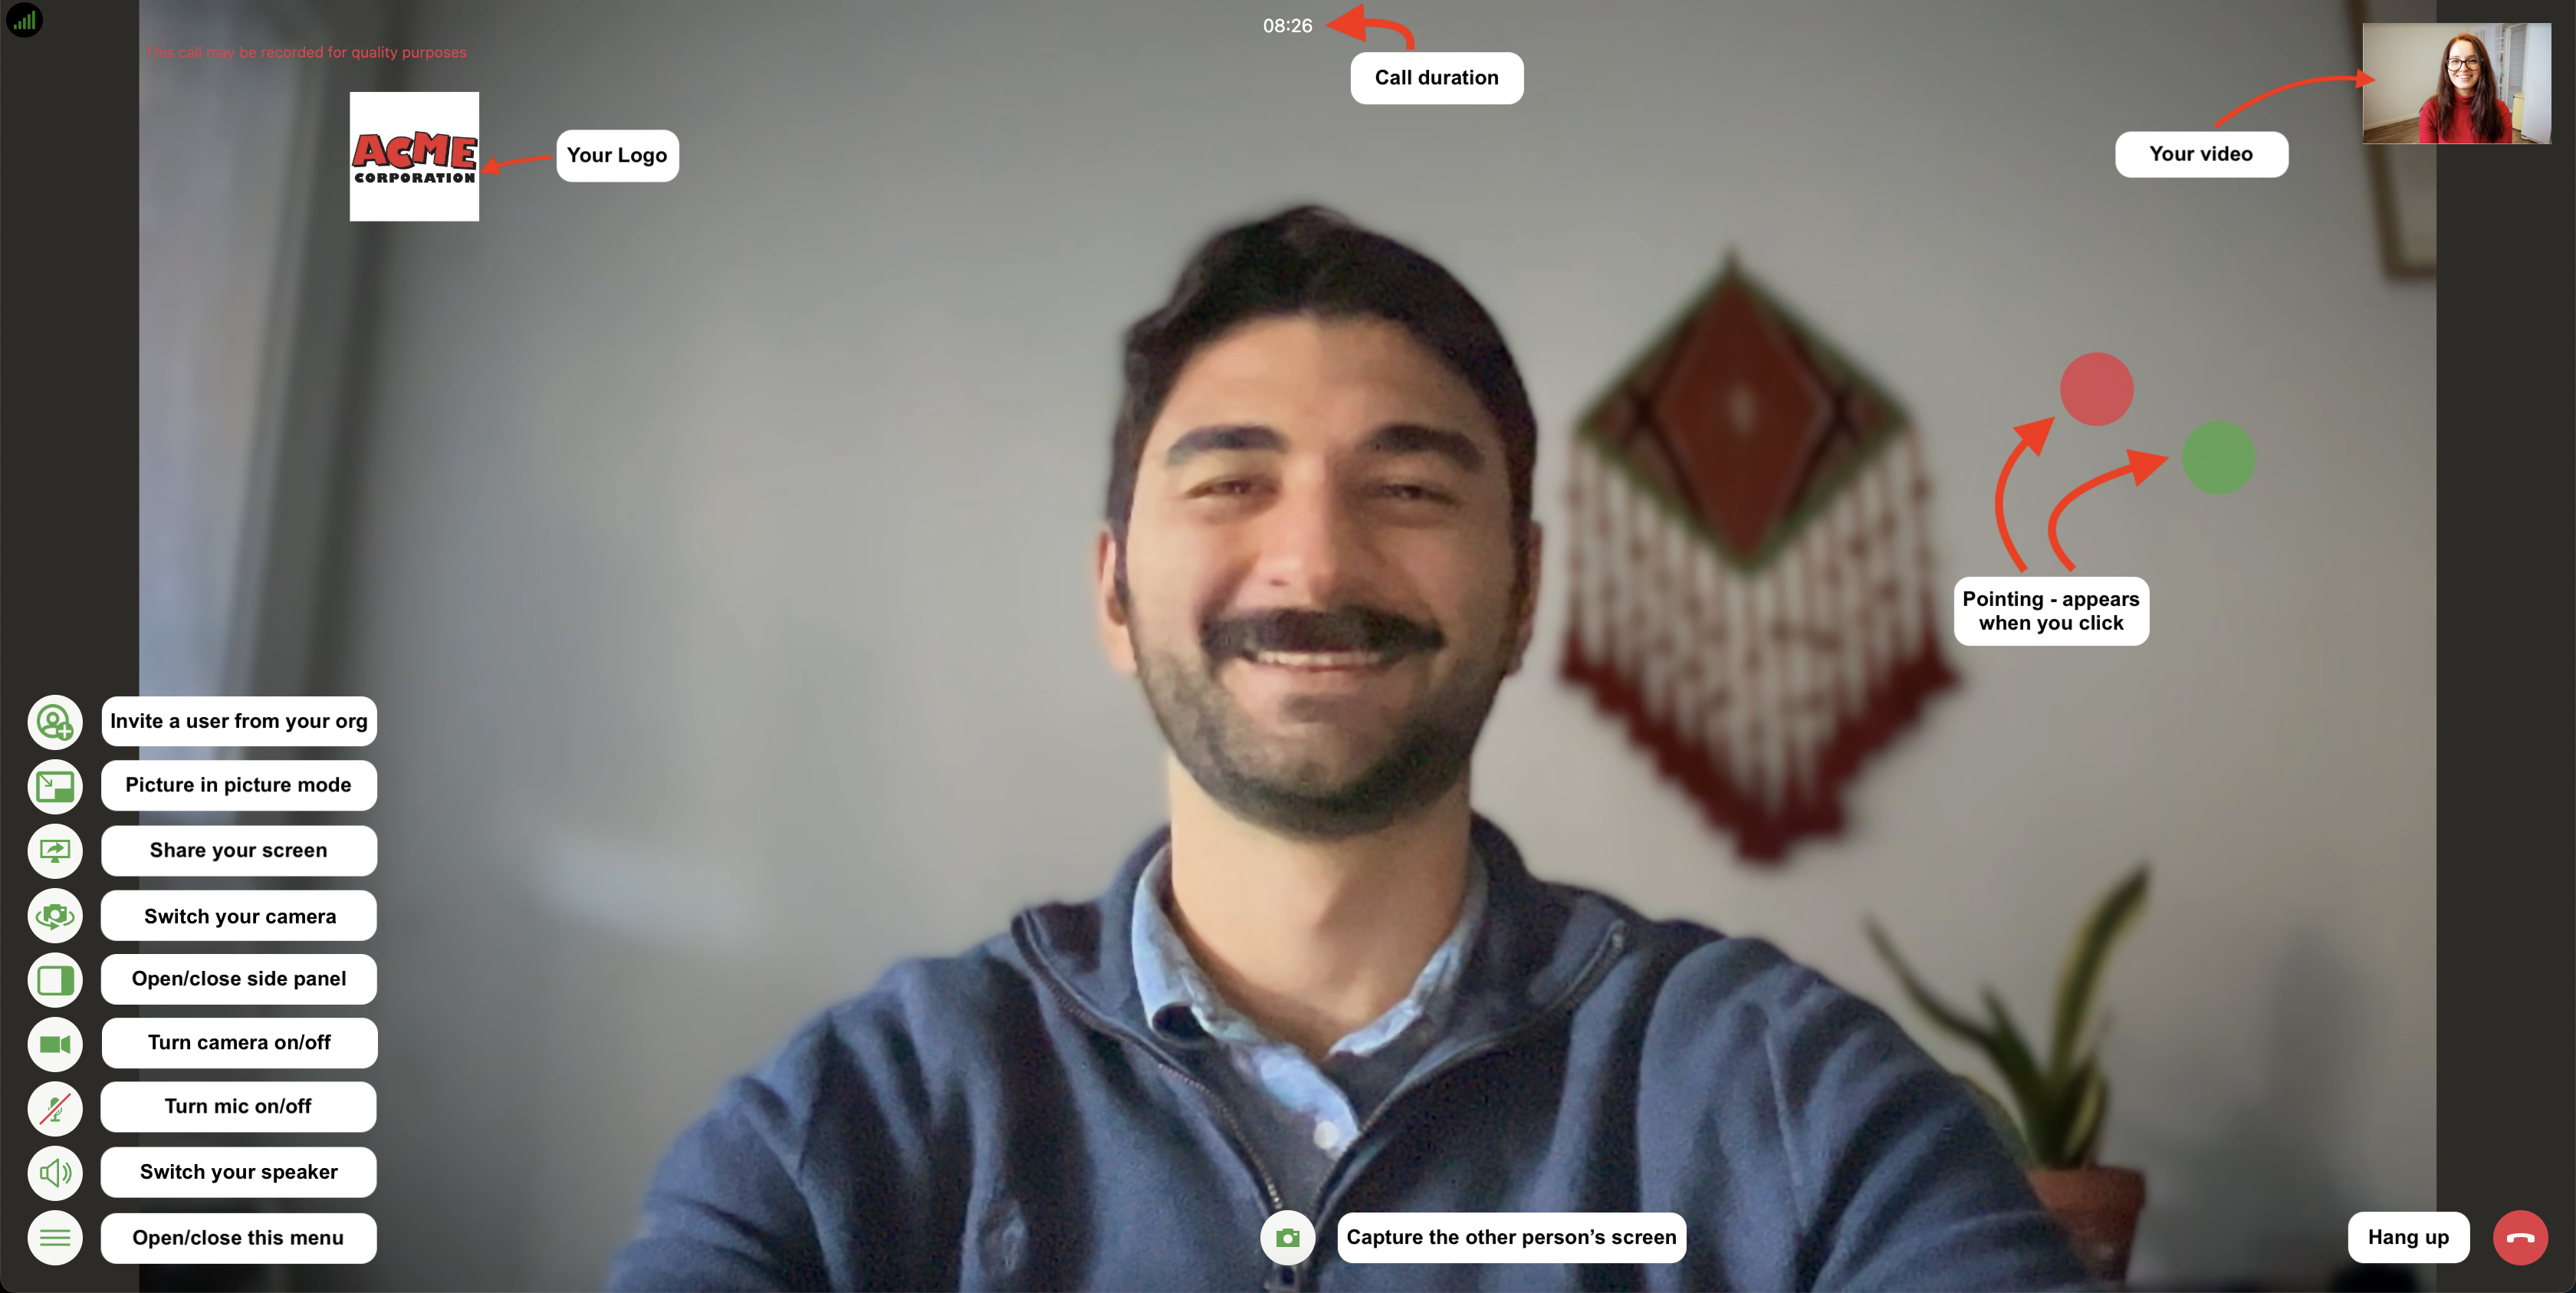
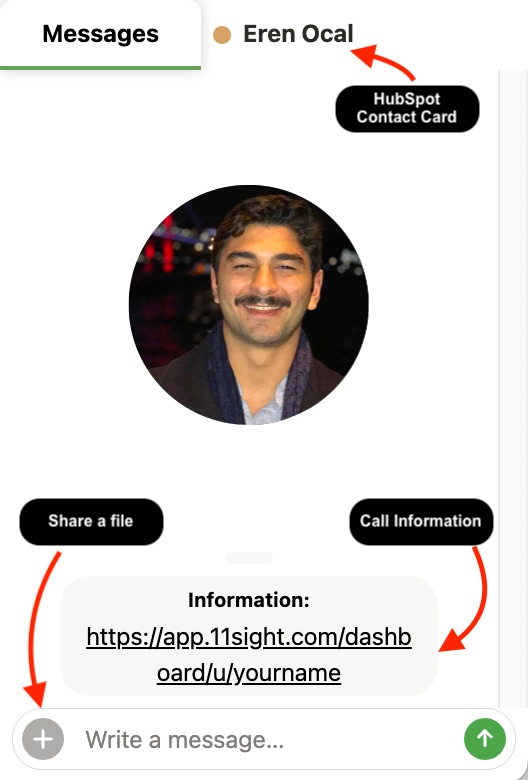
Side Panel
There is a side panel that will appear on the right hand side. Here you can chat with your caller, send files (size limit 25MB) and view their contact card (only visible with the HubSpot integration).
Users and Teams
Read this section to answer: “How can I add users and teams?” and “How can I set up the call orchestration?”
Reading time: 45 seconds
Setup Time: 2 minutes
Adding Users and Teams
Users are team members who will be answering the calls. Each team member has their own user line which can be used to call them directly.
To create new users, navigate to Organization Management > Set Up > Users. You can batch create multiple users from Import Users.
Teams provide group lines that can ring multiple users at the same time. To create new teams, navigate to Organization Management > Set Up > Teams.
Team lines will count towards your user seat limit. If you’d like to add more seats to your organization, you can add them from Billing.
Forwarding and Escalation
Forwarding allows you to add users to a team line. When a call comes on the team line, all users in that team will receive the call at the same time. First person to pick up will get connected.
Escalation allows you to ring another user if a user or a team fails to answer the call. All escalated users will receive the call if it hasn’t been answered within 15 seconds of starting.

To set up forwarding and escalation click on the Escalation Icon.
Campaigns
Read this section to answer: “How can I share my call links?” and “Which campaign is right for me?” and “How do I collect information from callers?”
Reading time: 2 minutes
Setup Time: 10 minutes
Now that you have your users and teams set up, how do you start receiving calls? There are 4 different ways you can share your user or team lines.
Trackers
Use Trackers with
Chatbots
Email Campaigns
Blogs
Social Media
Web Listings (G2, Capterra, etc.)
Web Applications
Trackers allow you to know how many times each call link was clicked on. To create one navigate to Campaign Management > Trackers.
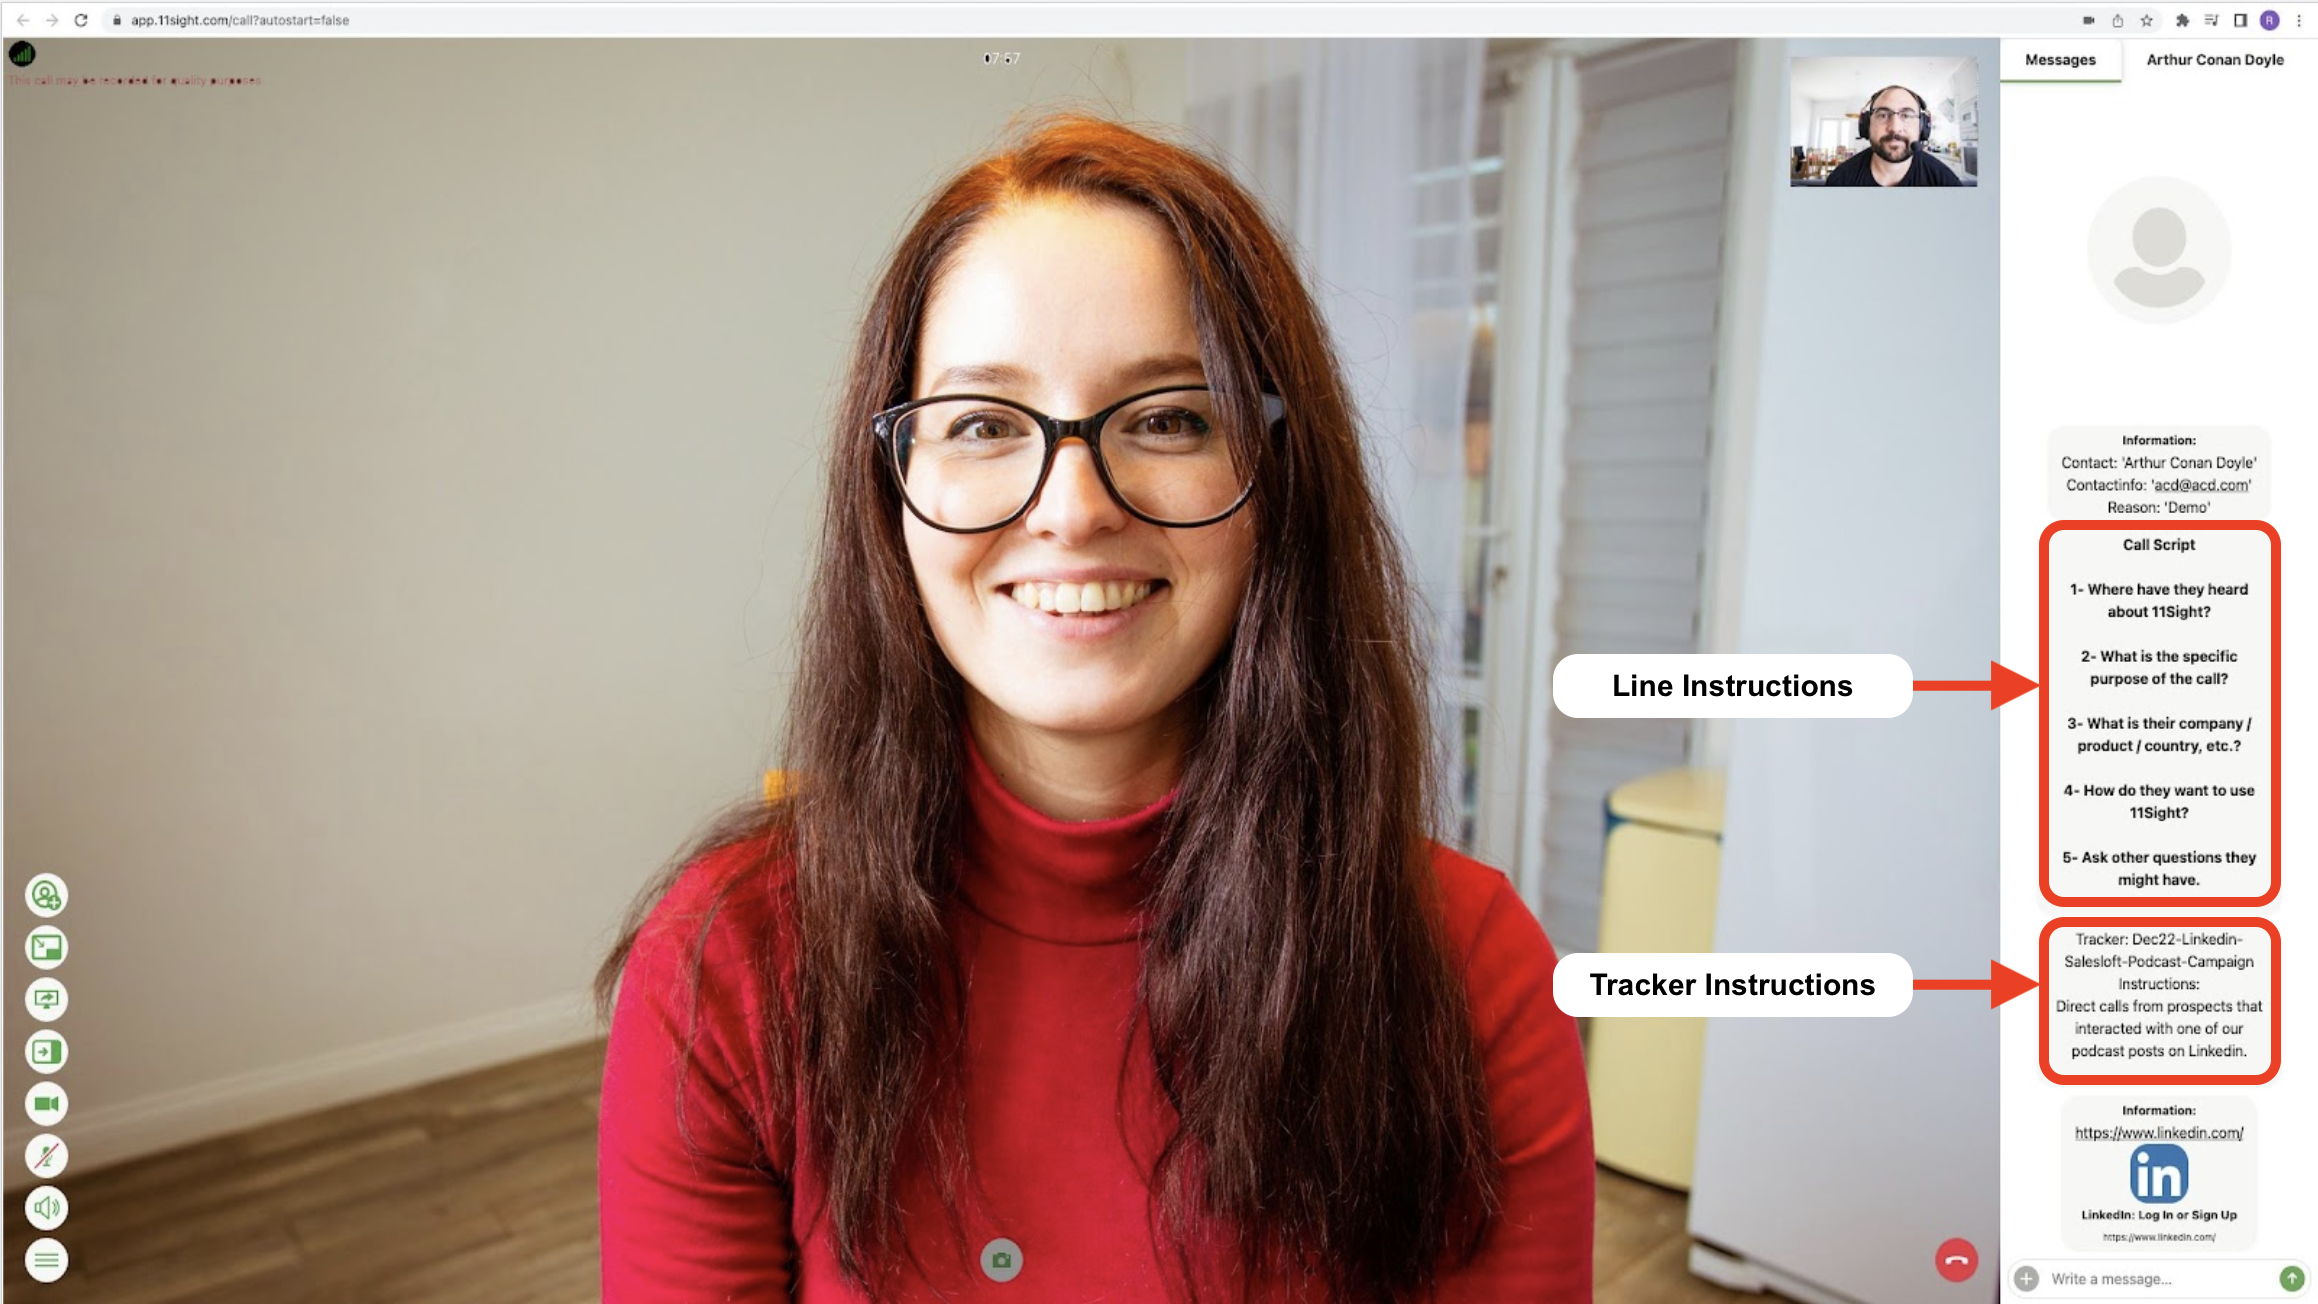
The Tracker Name is displayed to the User before each call along with the Form Information and Orchestration information.
Tracker Instructions are displayed to the users that answer the call.
QR Codes
Use QR Codes with
Print Campaigns
Tradeshows
Business Cards
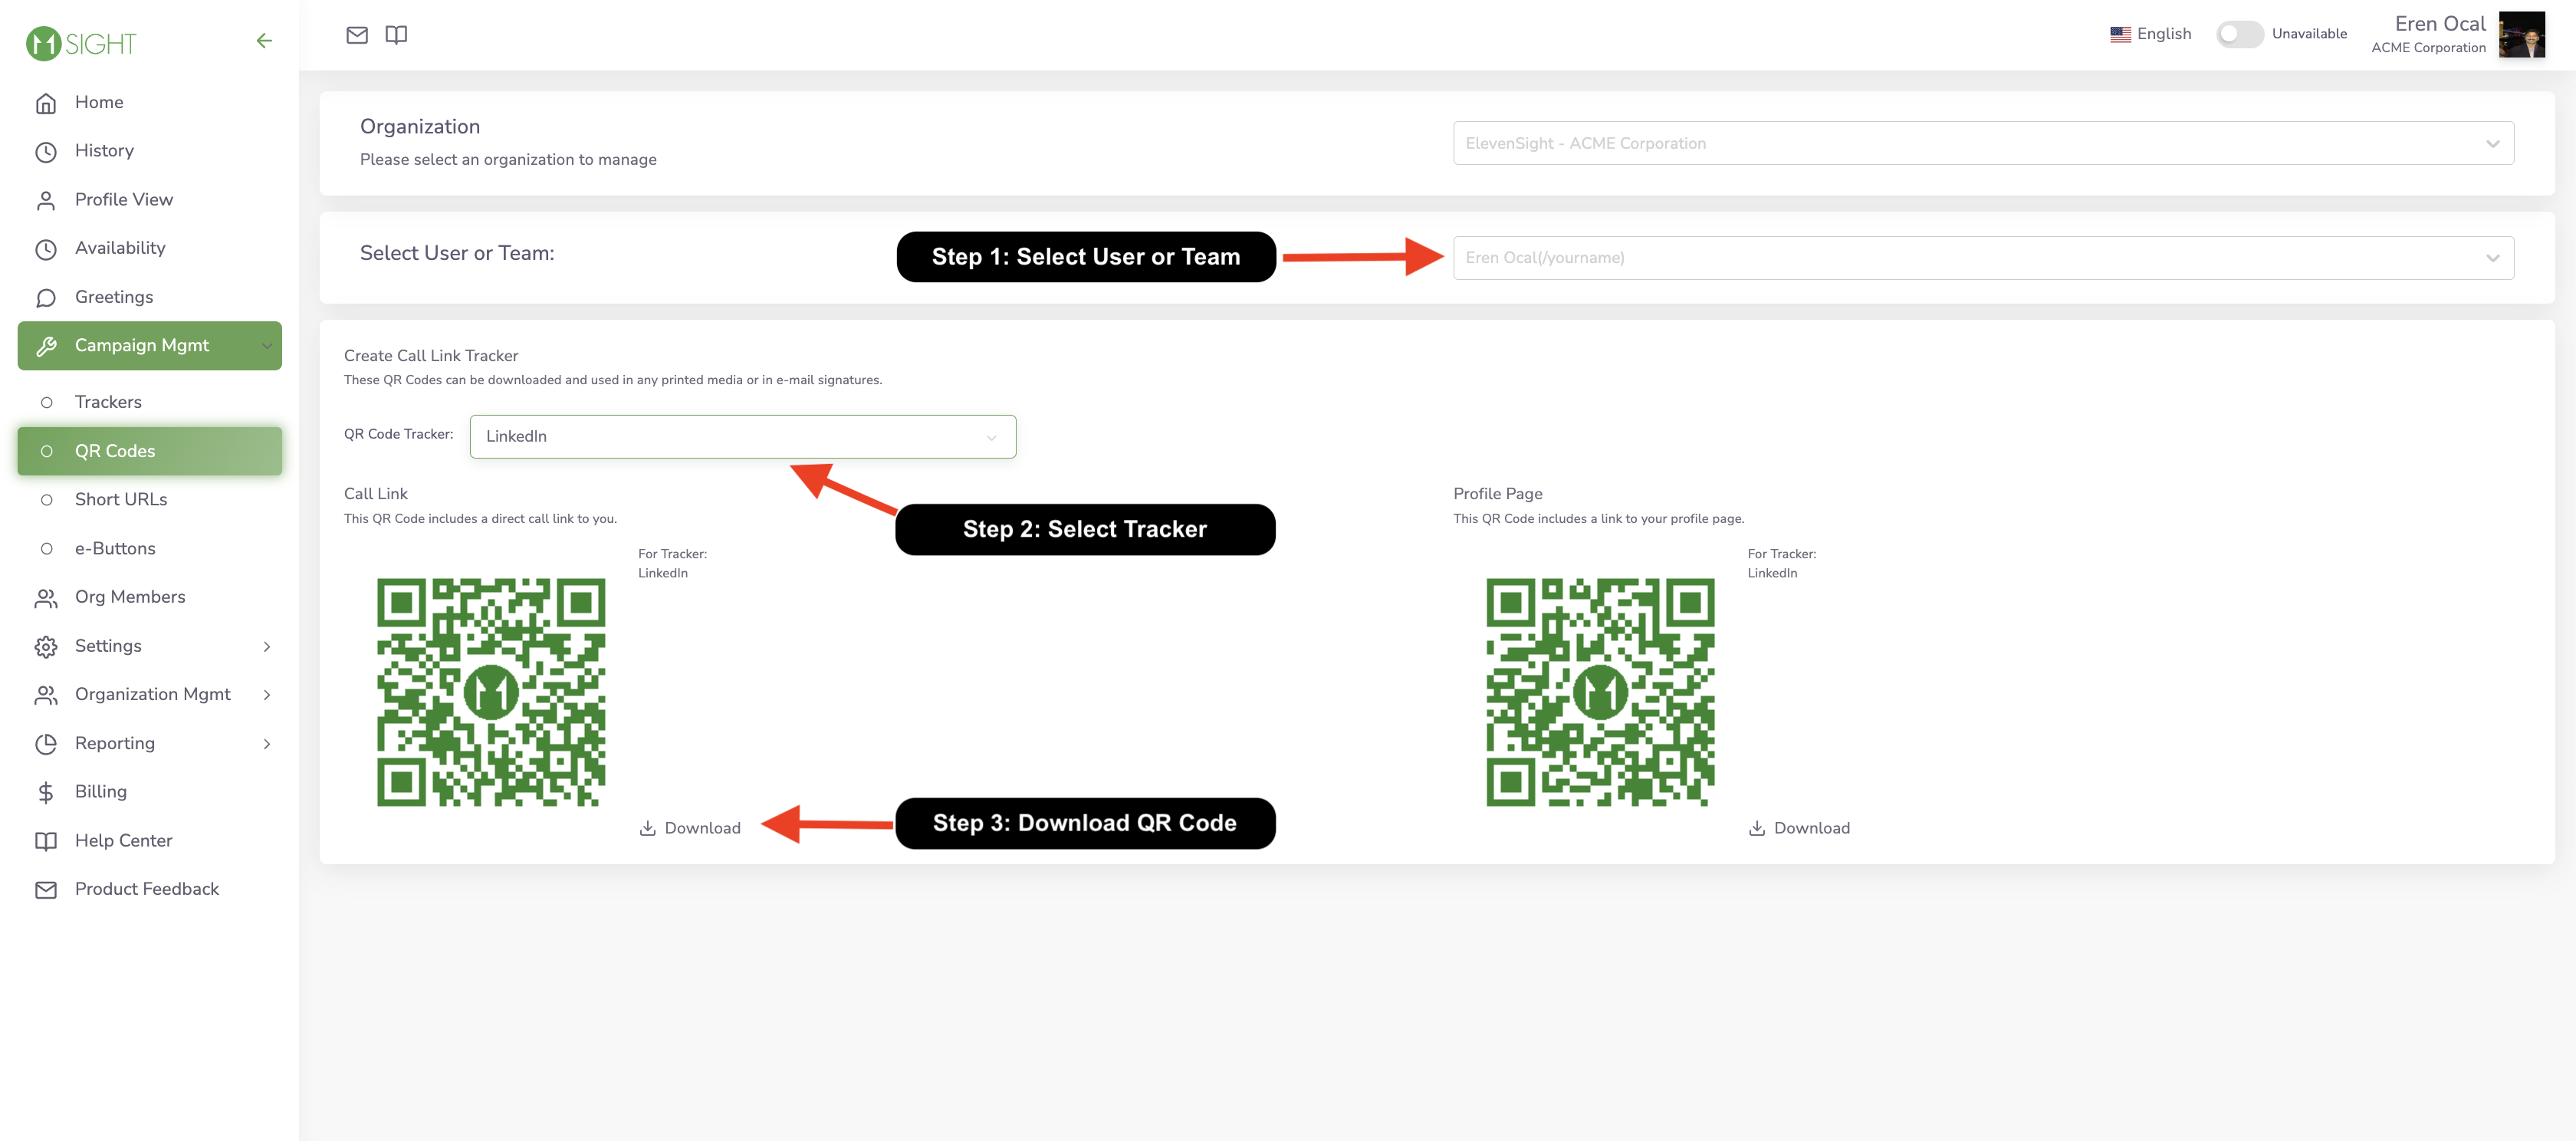
You can create and download QR Codes for each Tracker. To create one navigate to Campaign Management > QR Codes.
Short URLs
Use Short URLs when
Verbally giving someone your call link
Short URLs are easy to remember and share. You can find them under Campaign Management > Short URLs.
You have 3 short URLs available to you. You can change the link type to configure what type of call they will start.
If you’d like to learn how to create short links with your own domain, please see the CNAME section.
e-Buttons
Use e-Buttons with
Websites
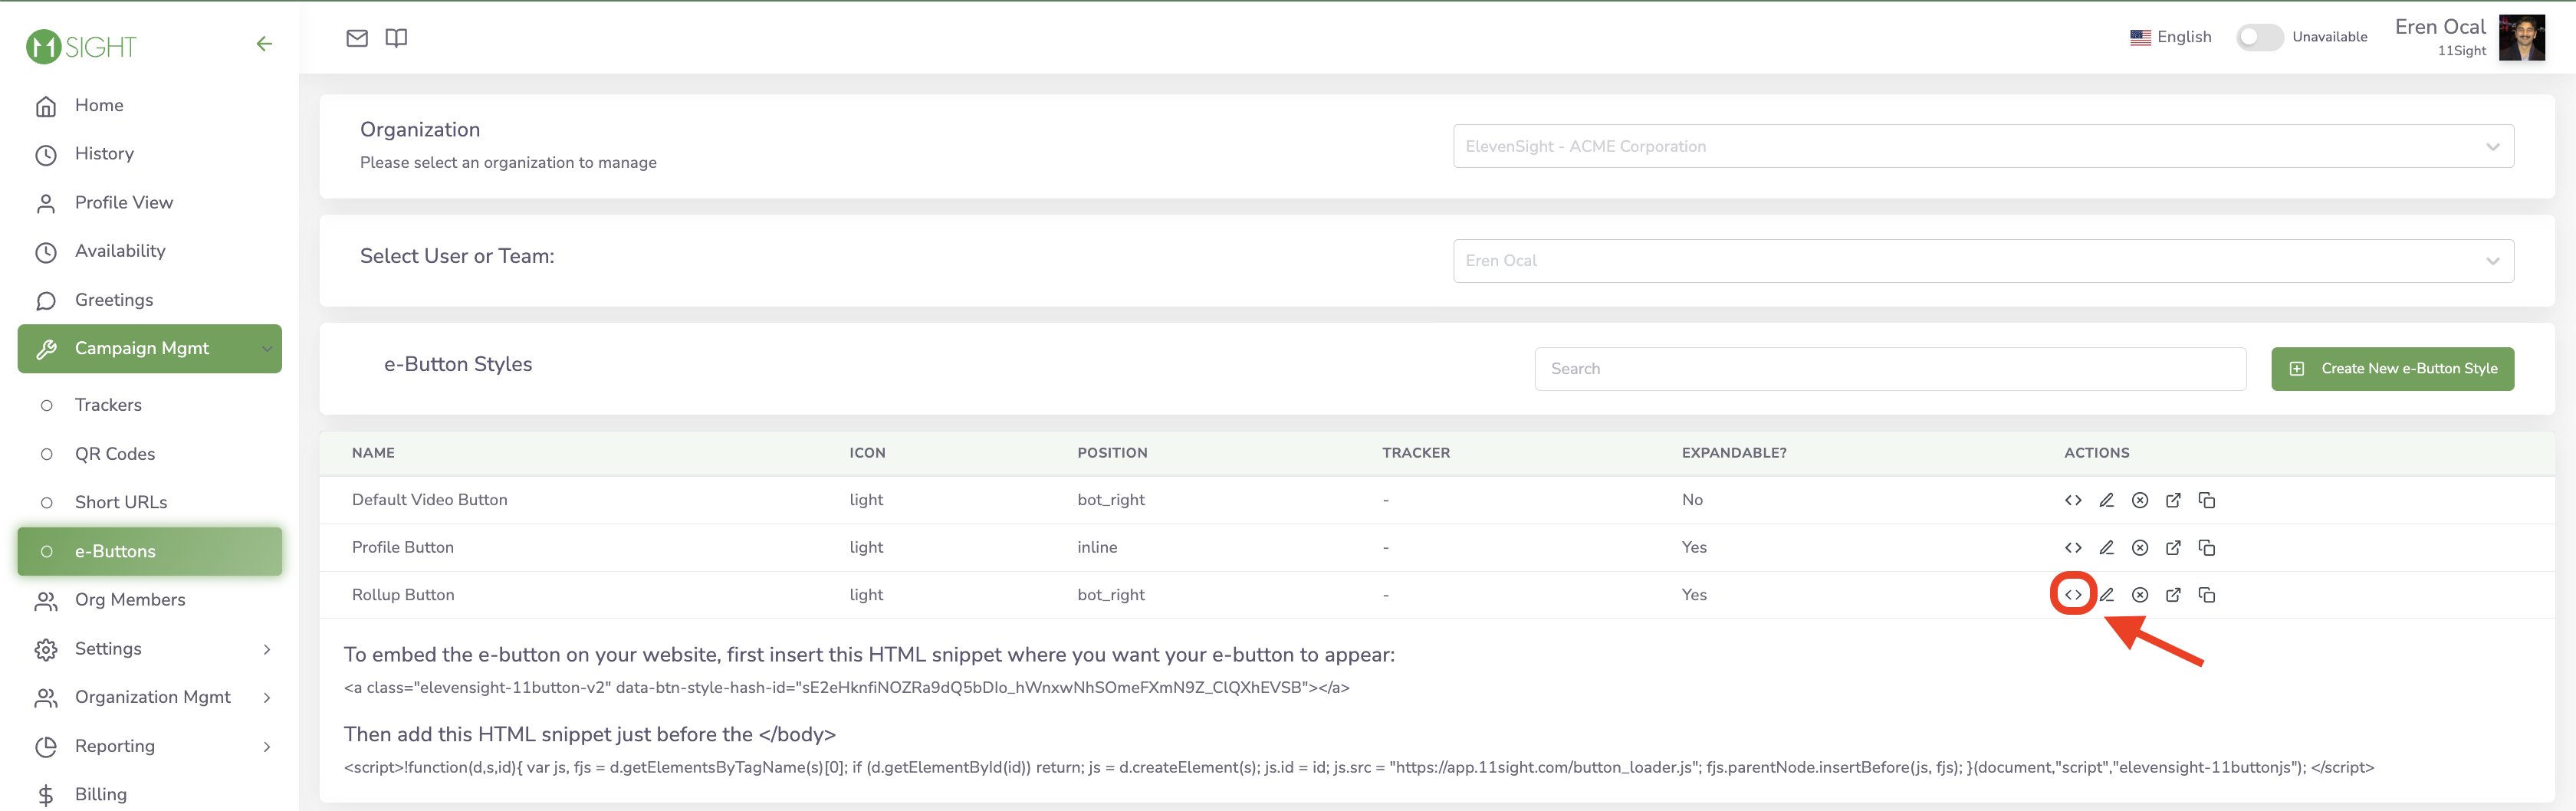
e-Buttons expand to show multiple call options. They can also show a pre-call form. To create one navigate to Campaign Management > e-Buttons.

You can customize the color, the text and the call option that are available in an e-Button. You can also add a Tracker to the e-Button to track the source of the call.
To embed the e-Button to your website, click on the <> icon and follow the instructions.
Multi-Line Buttons
You can display multiple user or team lines inside an e-Button. To create a multi-line button, navigate to Organization Management > Set Up > Multi-Line Button.
Forms
To collect information from your callers, you can set up pre-call forms. Navigate to Settings > e-Line Configurations.
Make sure to select the User or Team and select an option under Pre-call Caller Information Form.
Use default form if you’re not using HubSpot.
Use HubSpot default form if you’re using HubSpot.
Use custom form if you’d like to change the default questions.
You can email 11Sight Support for help with form customizations.
Availability
Read this section to answer: “Am I going to receive calls at all times? What if I don’t want that?”
Reading time: 1 minute
Setup Time: 2 minutes
Availability Schedules
You can set a schedule for your available hours, so you don’t receive calls outside of those times.
To do so, navigate to Availability from the side menu.
Here, you can set yourself available between a window of time or for the entire day.
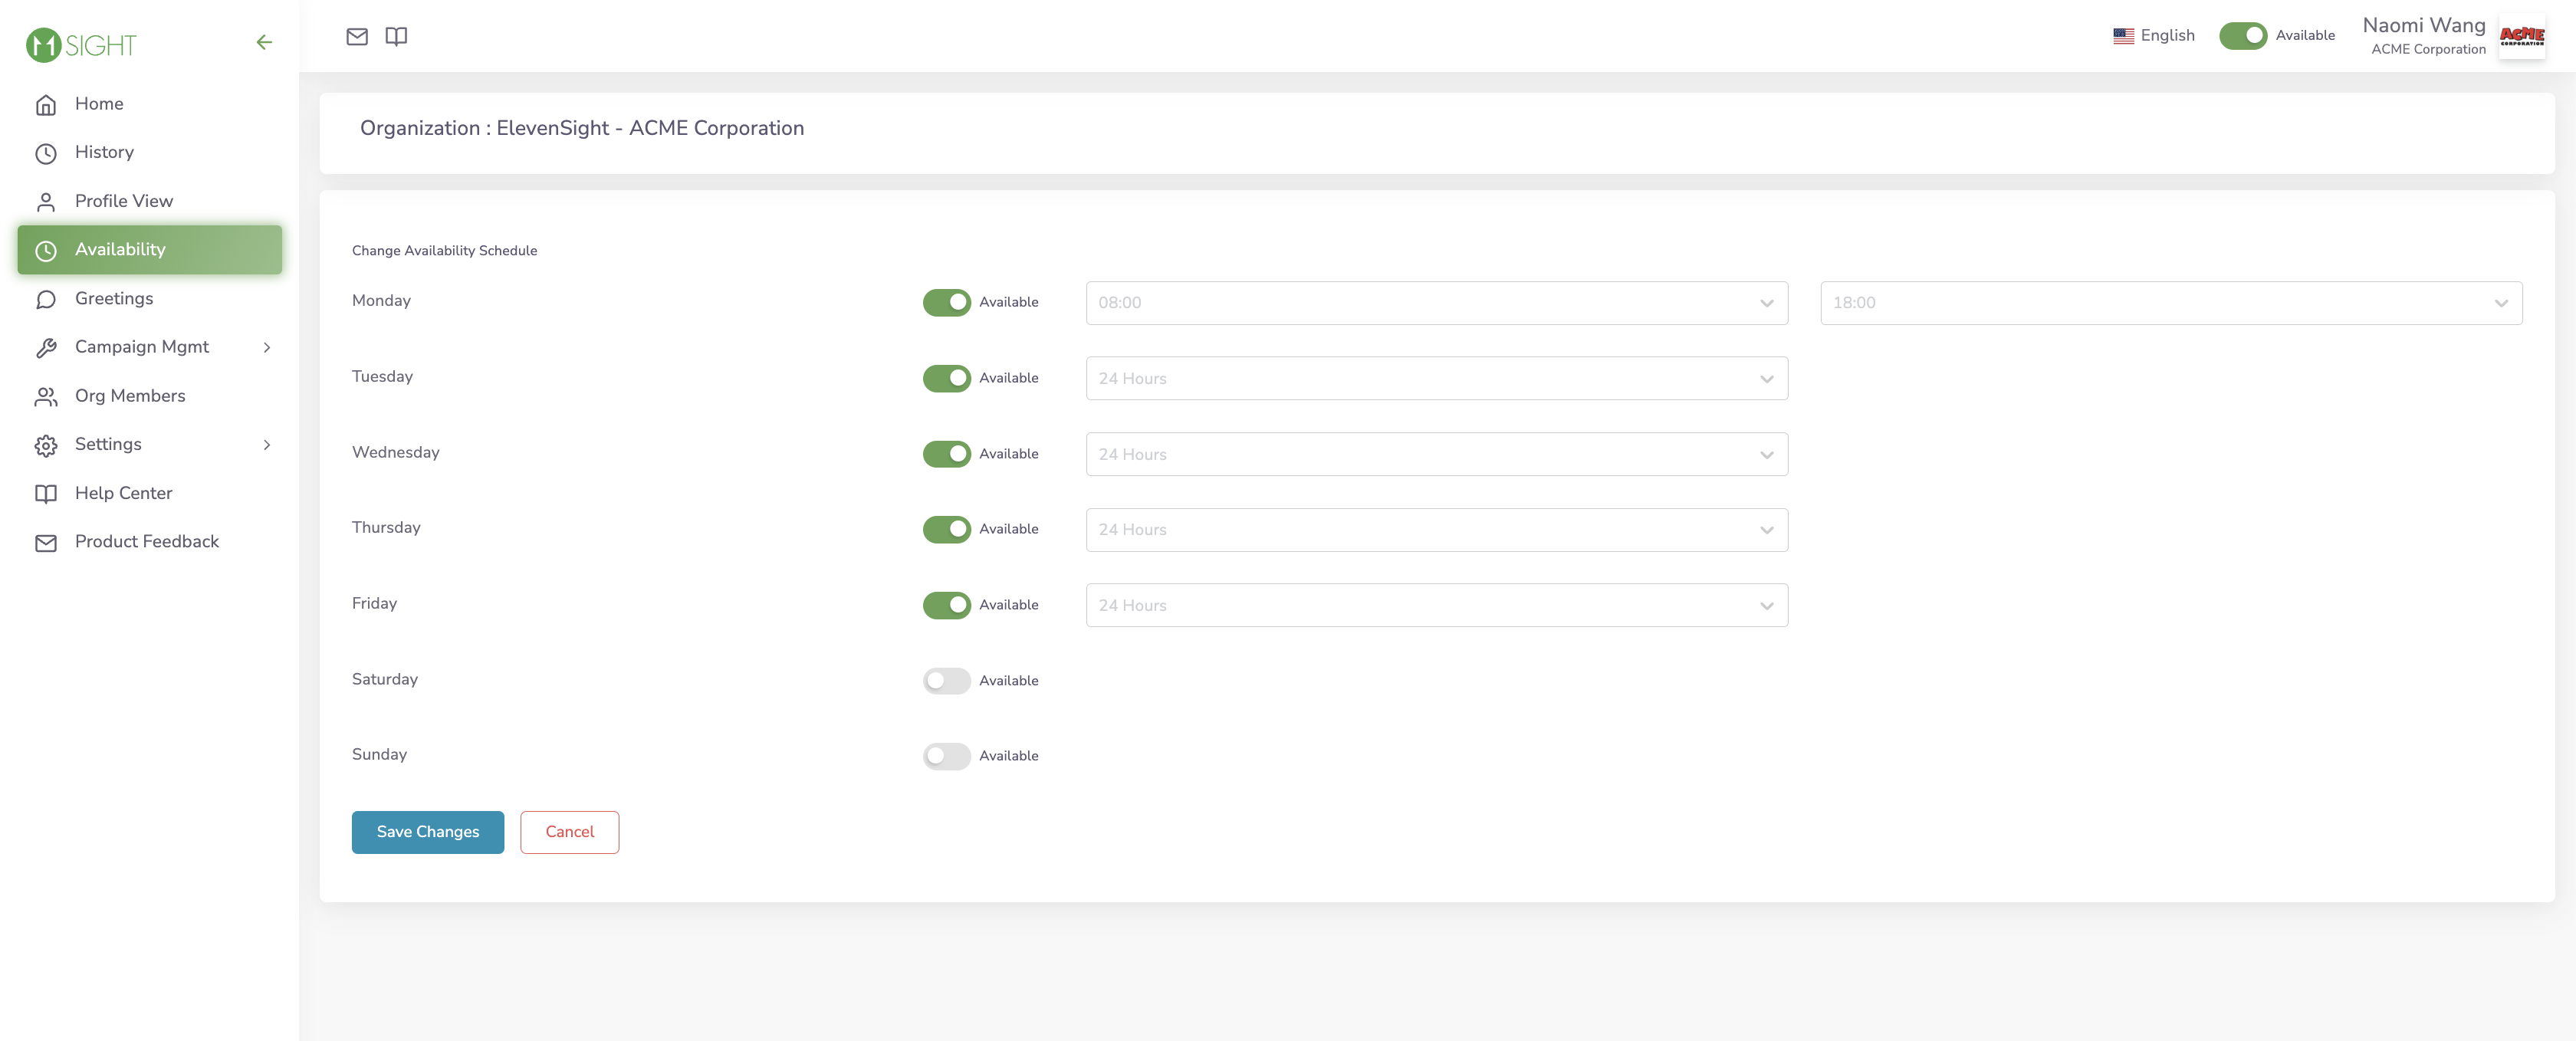
When a Team is set unavailable none of the users will receive the incoming calls. It is recommended to keep Teams available 24/7 and configure availability for users instead.
Don’t want to get distracted by an 11Sight call?
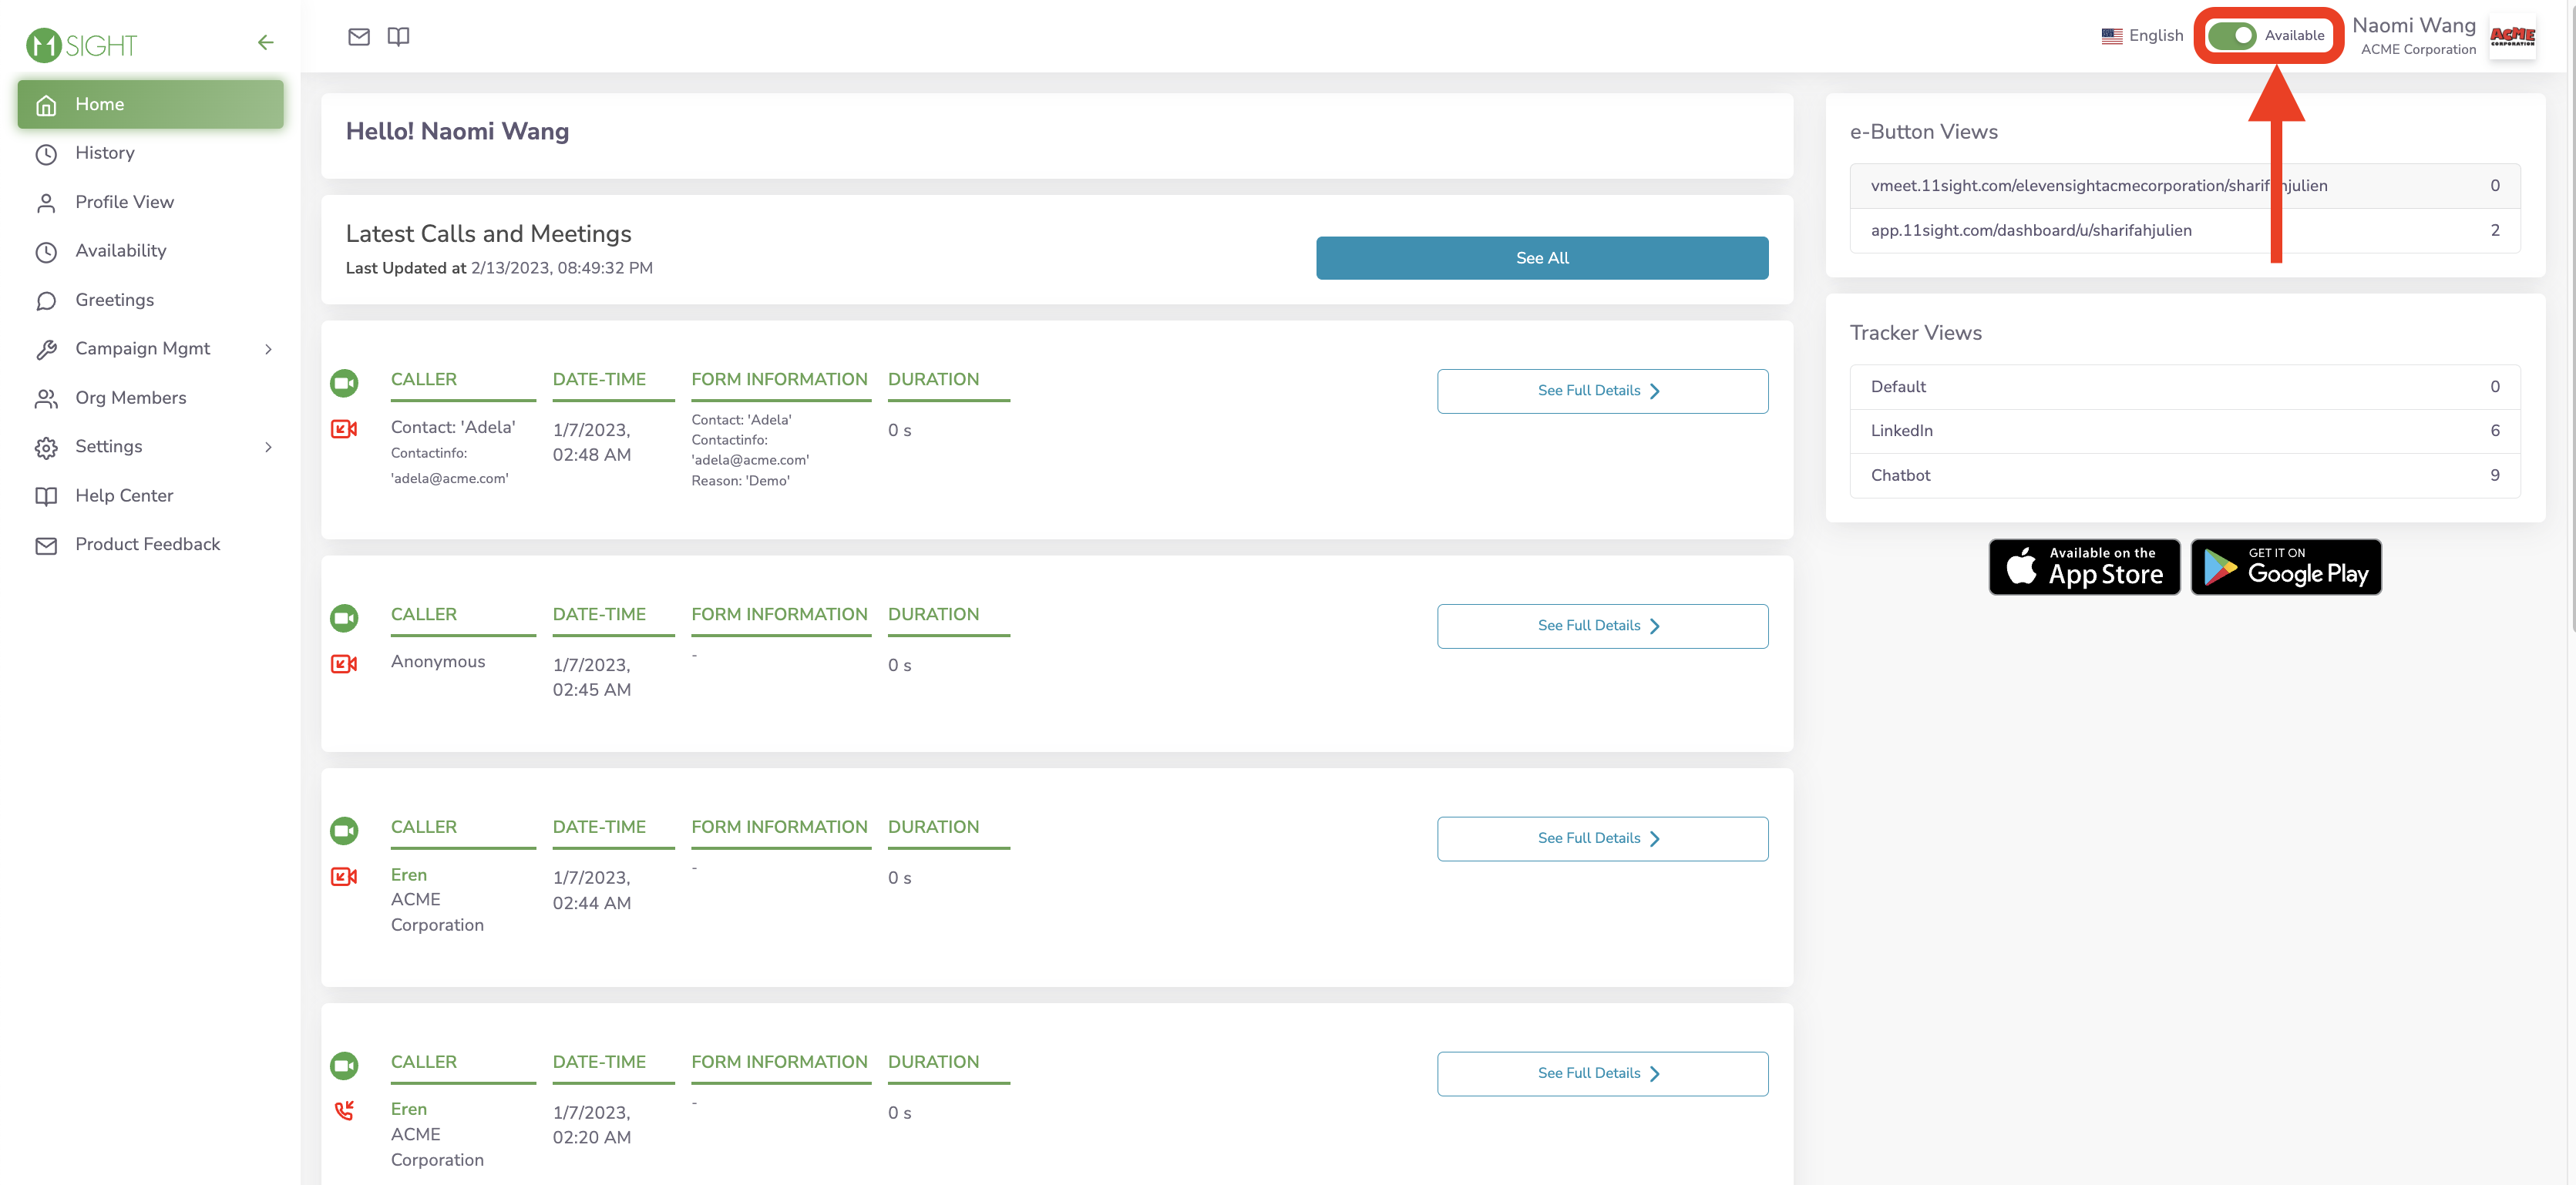
In another meeting? Turn your availability off.
You won’t get any calls when you are set as unavailable.
You can turn it off by using this switch on the top right corner:
Missed Calls
Read this section to answer: “What happens if I miss a call or if I’m unavailable?” and “How can I see call related details?”
Reading time: 1 minute
Setup Time: 5 minutes
Greetings
In the event that your miss a call, your callers will see a greeting message. You can configure your own message which can contain a text, a video and a button to your calendaring tool.
Here you can see a sample greeting message.
Here you can see the button in action:
You can configure your own greeting by navigating to Greetings from the side menu. Here you will see an option to set greeting messages for when you are available and unavailable.
Make sure to select the User or Team you would like to edit the Greetings for.
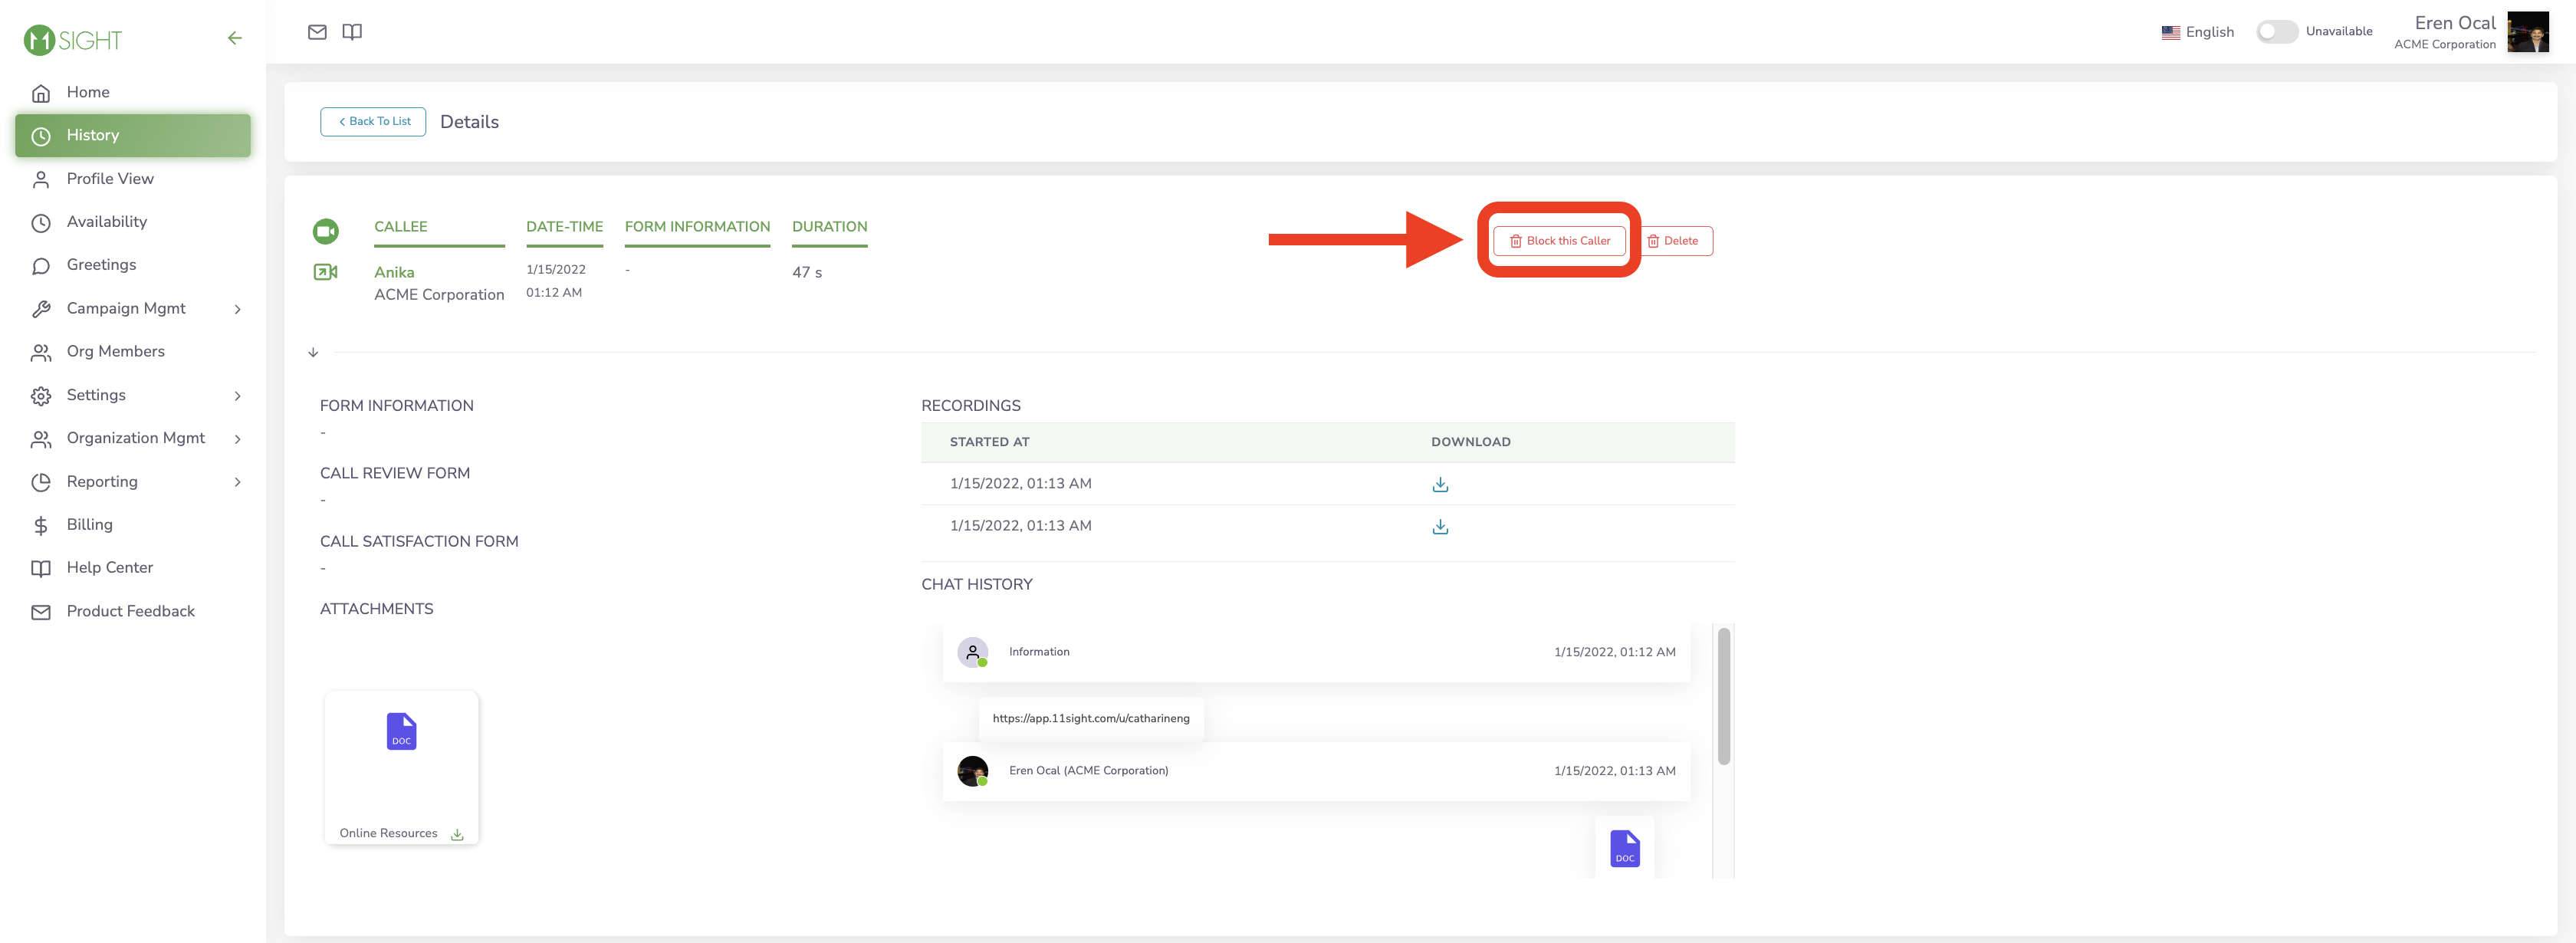
History
All calls, missed or answered, will appear in your history. Navigate to Reporting > User History on the side menu and you will see a list of all of your calls to date. You can select a user to view the call history of that user.
Click on More to display additional information about the call such as; Form Information, Attachments, Call Recordings and Chat History.

Block Spam Callers
You can block spam callers by clicking on See Full Details and then on Block this Caller.
Integrations
Integrations are only available for Premium and Enterprise Plans.
Reading time: 1 minute
Setup Time: 5 minutes
HubSpot
Our HubSpot integration allows users to see contact details in the call. Users can take notes and edit contact properties.
Contact properties can be configured to include custom properties for your organization.
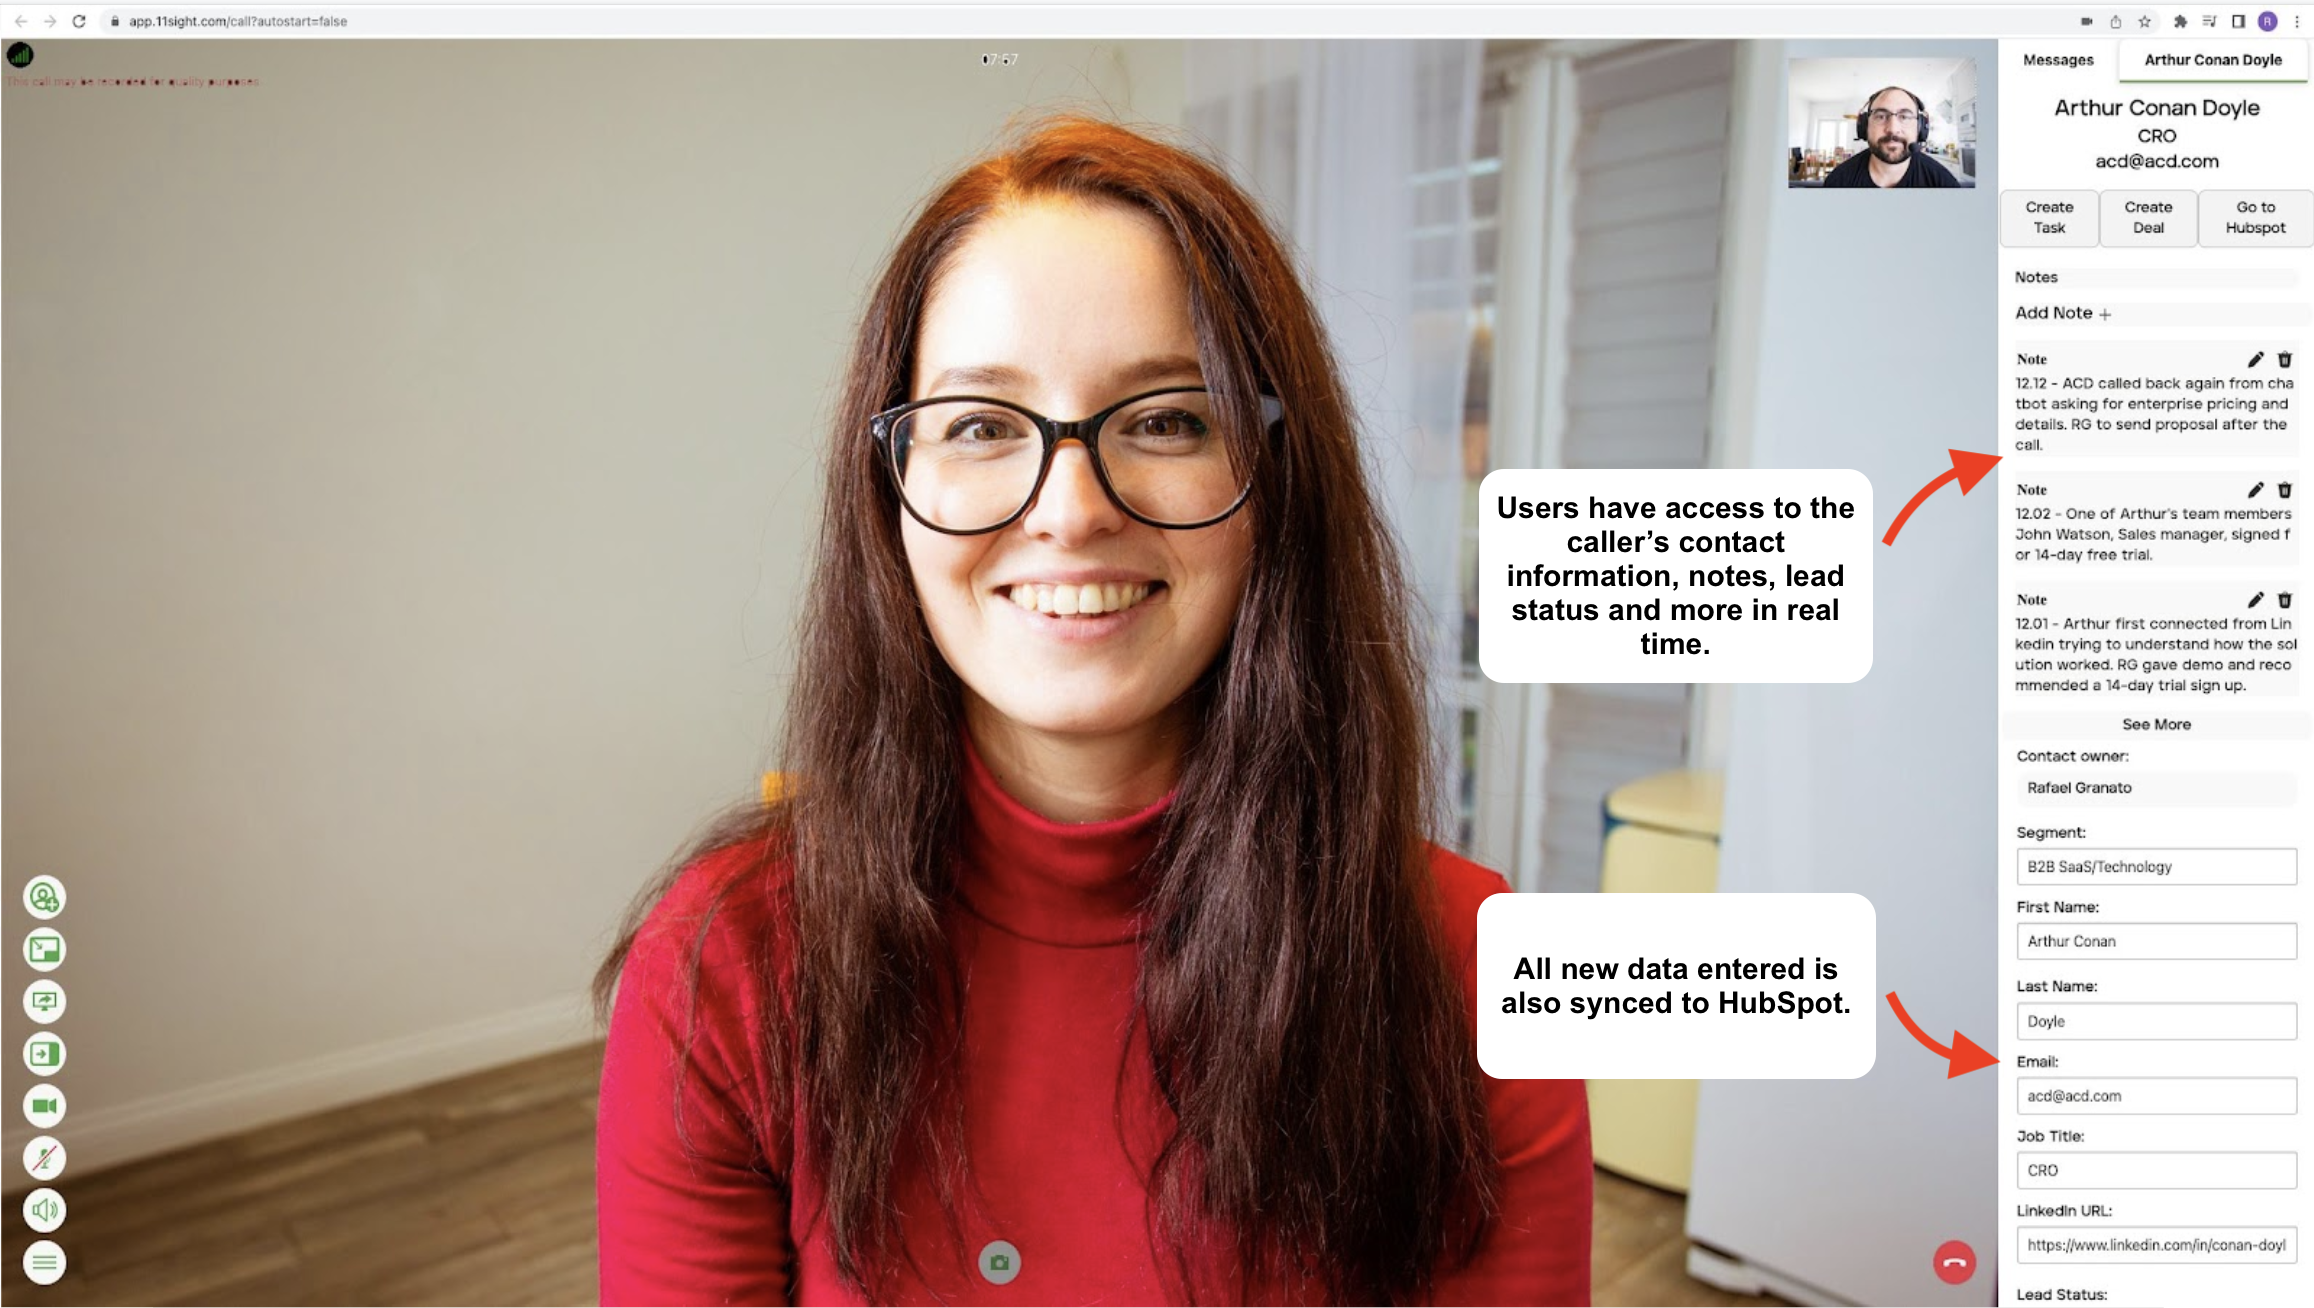
Call information, history and notes can be seen in HubSpot under the Contact’s activity.
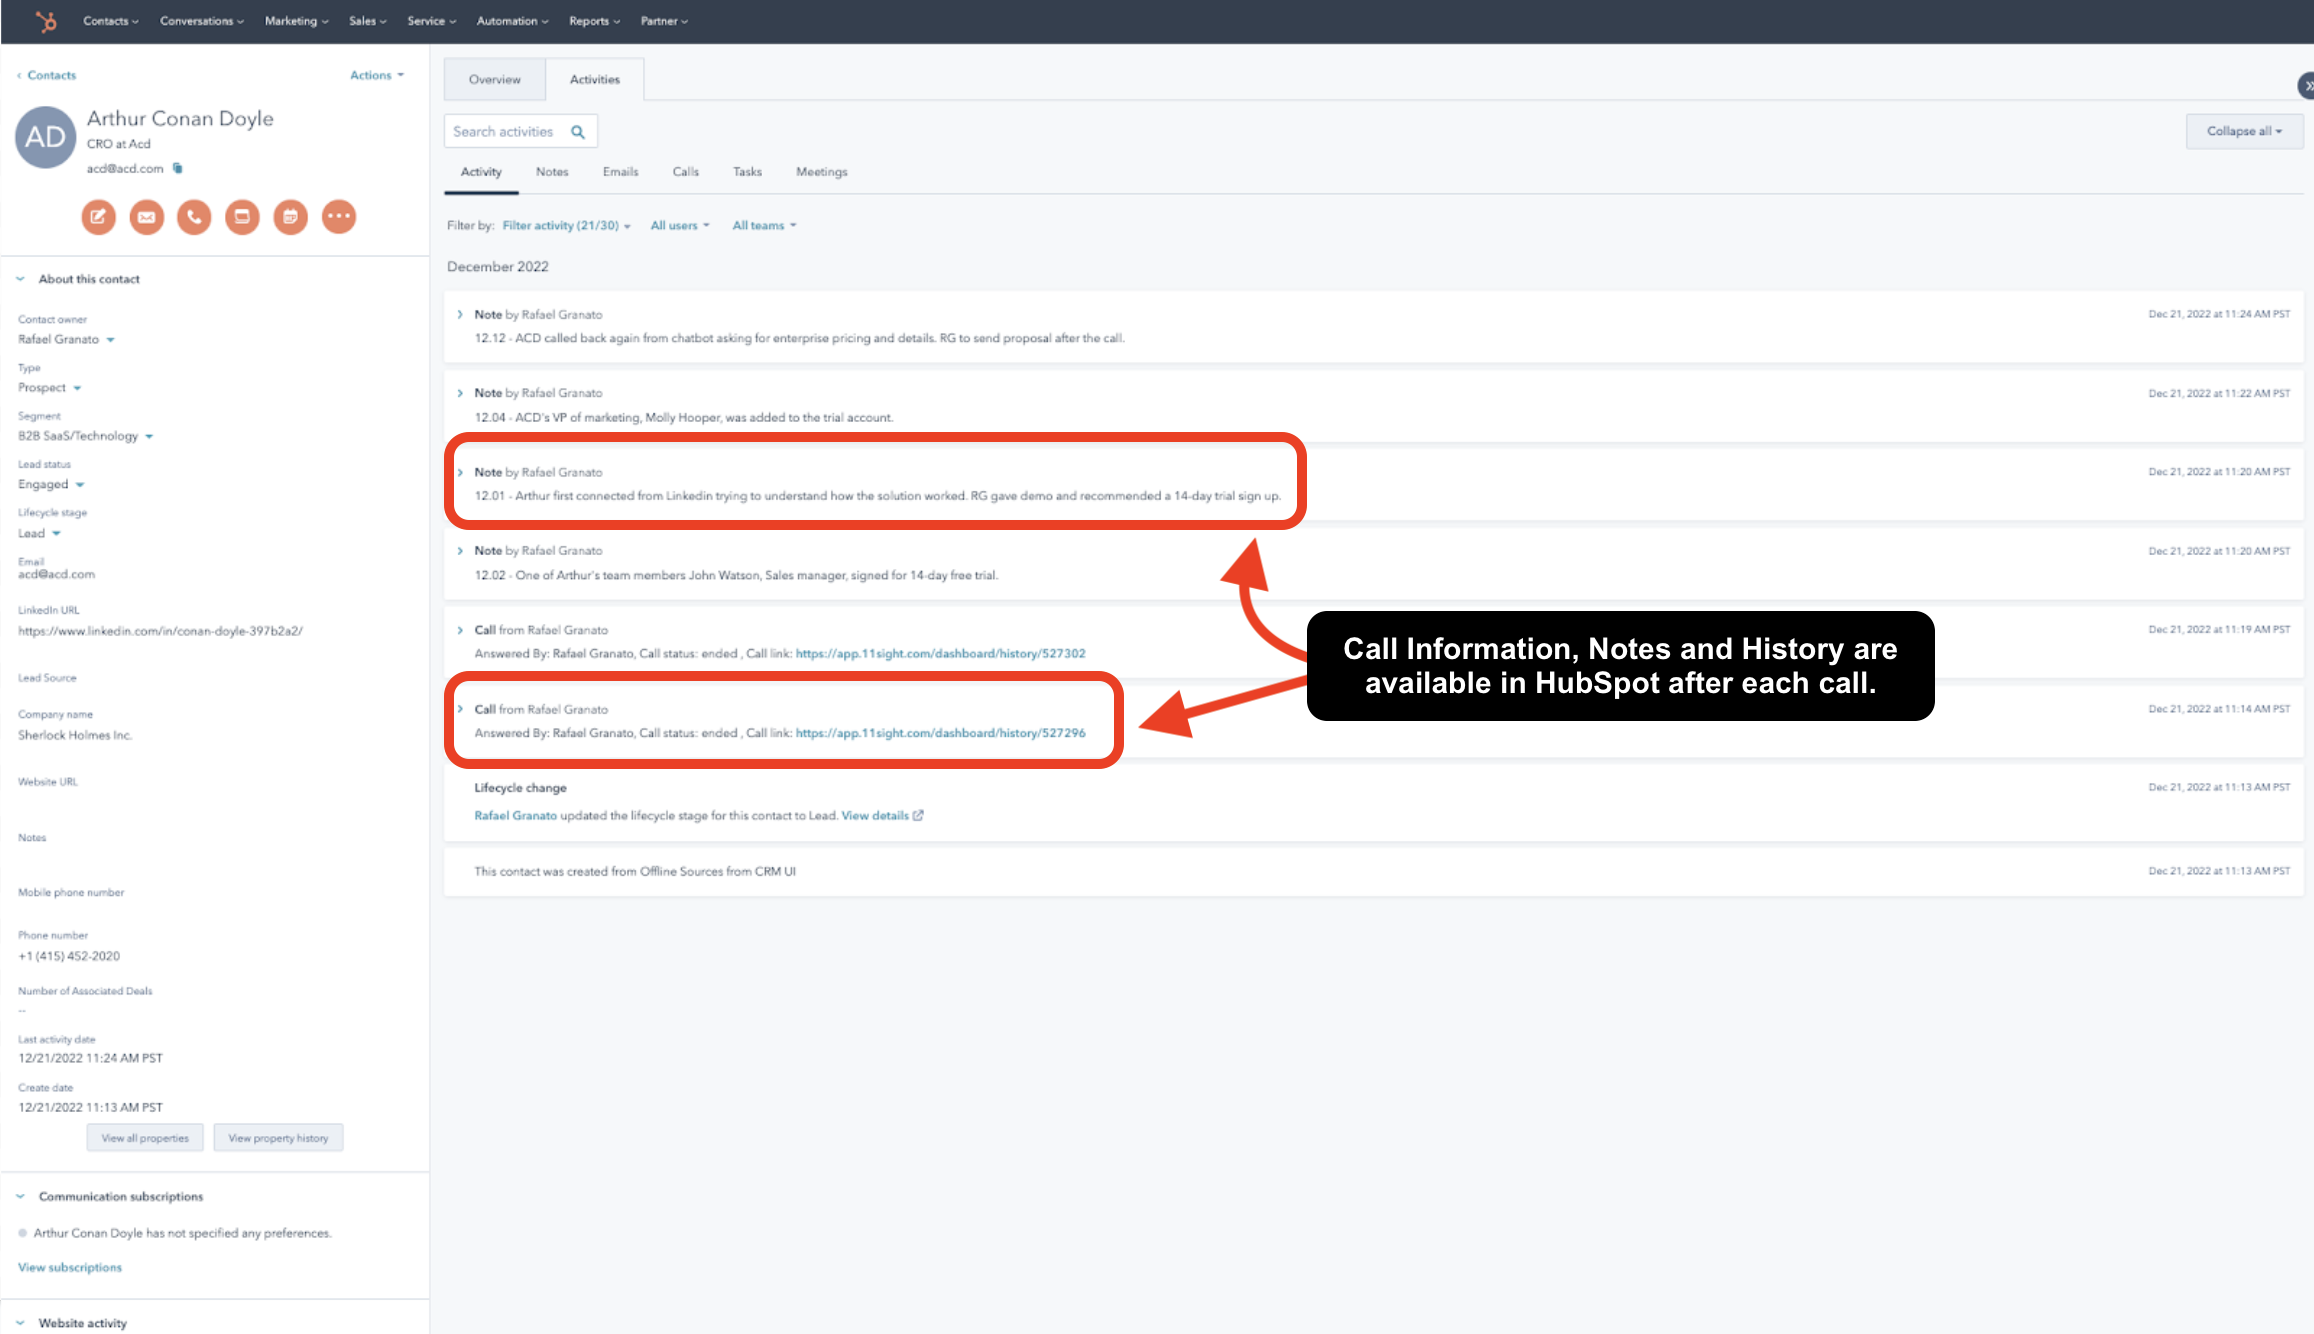
To learn more about how to set up the integration, please see here.
Zapier (Beta)
Our Zapier integration allows you to connect 11Sight to your CRM or call intelligence tools.
To learn more about the Zapier integration, please see here.
CNAME
CNAME allows you to create call and meeting links with your own domain such as:
To set up CNAME links follow these steps:
Create a CNAME record through your hosting provider. Point the server to cname.11sight.com
In 11Sight navigate to Organization Management > Org-Level Settings > Integrations.
Enter your subdomain i.e. call.yourdomain.com
Choose a Link Type, a User or a Room, a Path and a Page Title. Your CNAME link will be call.yourdomain.com/path
Upload a Favicon. It’s best to use a 16x16 pixel image.